This Document shows the step by step of upgrading E-Business Suites R 12.1.1 Database from 11gR1 RAC to 11gR2 RAC on 3-node database cluster. Below upgrade path was followed (in sequence) to achieve the final goal successfully.
(a) Shutdown Applications on all the nodes gracefully.
(b) Shutdown existing 11gR1 RAC database gracefully.
(c) Shutdown the CRS on all the RAC nodes.
(d) Take the Backup of entire system.
(e) Install/Upgrade RPMs required for 11gR2 RAC Installation.
(f) Add SCAN VIPs to the DNS.
(g) Setup of Network Time Protocol.
(h) Create 3 ASM Disks for 11gR2 OCR and Voting Disks.
(i) Hide the Existing 11gR1 CRS installation as if there is no Clusterware existed on the RAC Nodes.
(j) Install 11gR2 Grid Infrastructure under the new GRID_HOME.
(k) Install 11gR2 RAC database software.
(l) Install 11gR2 Example software.
(m) Move the existing 11gR1 ASM Diskgroups to the 11gR2 Grid Infrastructure ASM.
(n) The Database should be up without any issue as nothing has been changed from Database standpoint at this stage except the ASM which is now running from 11gR2 HOME.
(o) Apply the required patches to the existing 11gR1 HOME.
(p) Apply the Required Patches.
(q) Fresh install 11gR2 RAC (Software Only).
(r) Apply 11gR2 RAC Example Software on the same 11gR2 RAC HOME.
(s) Upgrade existing 11gR1 RAC database to 11gR2 RAC Manually.
(t) Enable and run the Autoconfig on the DB Tier from the 11gR2 RAC HOME.
(u) Run the AutoConfig on the APPS Tier to generate the new RAC enabled connect strings.
(v) Take the Complete Backup of the Entire System.
(w) listnener.ora, tnsnames.ora, sqlnet.ora and their ifiles from all the RAC nodes.
(x) listener.ora and tnsnames.ora from both the application nodes.
(y) CONTEXT_FILE from all the 5 nodes.
(z) pfile of the RAC database.
Existing Node configuration:
Node Type
|
NAME
|
Version
|
Function
|
Application Node1
|
appsnode1.hingu.net
|
Oracle EBS 12.1.1
|
WEB Node
|
Application Node2
|
appsnode2.hingu.net
|
Oracle EBS 12.1.1
|
Concurrent Node (Batch Processing)
|
RAC DB Node1
|
node1.hingu.net
|
Oracle RDBMS 11.1.0.7
|
Clustered DB node1
|
RAC DB Node2
|
node2.hingu.net
|
Oracle RDBMS 11.1.0.7
|
Clustered DB node2
|
RAC DB Node3
|
node3.hingu.net
|
Oracle RDBMS 11.1.0.7
|
Clustered DB node3
|
DNS Server
|
lab-dns.hingu.net
|
OEL 5.5
|
DNS
|
|
Before Upgrade
|
After the Upgrade
|
E-Business Suite
|
Oracle EBS R12.1.1
|
Oracle EBS R12.1.1
|
BASE Directory
|
/u01/app/oracle/ebsR12
|
/u01/app/oracle/ebsR12
|
ORACLE_HOME
|
/u01/app/oracle/ebsR12/apps/tech_st/10.1.2
|
/u01/app/oracle/ebsR12/apps/tech_st/10.1.2
|
IAS_ORACLE_HOME
|
/u01/app/oracle/ebsR12/apps/tech_st/10.1.3
|
/u01/app/oracle/ebsR12/apps/tech_st/10.1.3
|
APPL_TOP
|
/u01/app/oracle/ebsR12/apps/apps_st/appl
|
/u01/app/oracle/ebsR12/apps/apps_st/appl
|
INST_TOP
|
/u01/app/oracle/ebsR12/inst/apps/<CONTEXT_NAME>
|
/u01/app/oracle/ebsR12/inst/apps/<CONTEXT_NAME>
|
Port Pool
|
1
|
1
|
Application OS Owner
|
applmgr:(oinstall, dba)
|
applmgr:(oinstall, dba)
|
OS Platform
|
Oracle Enterprise Linux 5.5 (32 bit)
|
Oracle Enterprise Linux 5.5 (32 bit)
|
|
DB Tier
|
DB Tier
|
RDBMS
|
Oracle 11gR1 RAC (11.1.0.7)
|
Oracle 11gR2 RAC (11.2.0.1)
|
ORACLE_BASE
|
/u01/app/oracle
|
/u01/app/oracle
|
ORACLE_HOME
|
/u01/app/oracle/EBSR12
|
/u01/app/oracle/db11201
|
DB_HOME Owner
|
oracle:(oinstall, dba)
|
oracle:(oinstall, dba)
|
DB LISTENER
|
LABDB_LISTENER
|
LABDB_LISTENER
|
DB Listener Host/port
|
node1-vip, node2-vip, node3-vip (TCP:1522)
|
node1-vip, node2-vip, node3-vip (TCP:1522)
|
DB Storage Type, File Management
|
ASM with OMFs
|
ASM with OMFs
|
ASM diskgroups for DB and FRA
|
DATA (60GB), FRA (10GB)
|
DATA (60GB), FRA (10GB)
|
OS Platform
|
Oracle Enterprise Linux 5.5 (32 bit)
|
Oracle Enterprise Linux 5.5 (32 bit)
|
Clusterware
|
Oracle 11gR1 Clusterware 11.1.0.7
|
Oracle 11gR2 Grid Infrastructure 11.2.0.1
|
ASM
|
Oracle 11gR1 RAC 11.1.0.7
|
Oracle 11gR2 Grid Infrastructure 11.2.0.1
|
ASM_HOME
|
/u01/app/oracle/asm
|
/u01/app/grid11201
|
Cluster Name
|
Lab
|
Lab
|
Database Cluster Nodes
|
node1, node2, node3
|
node1, node2, node3
|
Clusterware Home
|
/u01/app/oracle/crs (CRS_HOME)
|
/u01/app/grid11201 (GRID_HOME)
|
Clusterware Owner
|
oracle:(oinstall, dba)
|
oracle:(oinstall, dba)
|
VIPs
|
node1-vip, node2-vip, node3-vip
|
node1-vip, node2-vip, node3-vip
|
SCAN
|
N/A
|
lab-scan.hingu.net
|
SCAN VIPs
|
N/A
|
3 SCAN VIPs resolving lab-scan.hingu.net by DNS
|
SCAN_LISTENER Host/port
|
N/A
|
Scan VIPs Endpoint: (TCP:1525)
|
OCR and Voting Disks Storage Type
|
Raw Devices
|
ASM
|
OCR Disks/Voting Disk
|
/dev/raw/raw1-2 (OCR), /dev/raw/raw3-5 (Voting)
|
+GIS_FILES (Normal Redundancy)
|
ASM_HOME
|
/u01/app/oracle/asm
|
/u01/app/grid11201
|
ASM_HOME Owner
|
oracle:(oinstall, dba)
|
oracle:(oinstall, dba)
|
ASMLib user:group
|
oracle:oinstall
|
oracle:oinstall
|
ASM LISTENER
|
LISTENER (TCP:1521)
|
LISTENER (TCP:1521)
|
Software/Patches Required in this Upgrade:
Oracle 11g R2 Grid Infrastructure (11.2.0.1)
Oracle Database software 11g R2 (11.2.0.1)
Oracle Database Example software 11g R2 (11.2.0.1)
Patch 8919489 (12.1 TXK.B Delta 3)
Patch 9583541 (Post requirement for the patch 8919489)
Patch 9062910 (11g Release 2 interoperability patch for Release 12.1)
Patch 10163753 (Application Patch)
Patch 11071569 (Application Patch)
Patch 9738085 (Application Patch -- AutoConfig)
Patch 9852070 (Application Patch -- AutoConfig)
Patch 6400501 (Application Patch – 10.1.2 ORACLE_HOME)
Patch 7695070 (Database Patch (for 11gR1) -- Prereq Patch for DSTv16 12320006)
Patch 12320006 (Database Patch -- DSTv16 for 11gR1 and 11gR2)
Patch 12565410 (Database Patch -- OJVM DSTv16)
Patch 6880880 (Latest OPatch)
Documents Reviewed/Followed:
· Interoperability Notes EBS R12 with Database 11gR2 [ID 1058763.1]
· Oracle E-Business Suite Installation and Upgrade Notes Release 12 (12.1.1) for Linux x86 [ID 761564.1]
· Using Oracle 11g Release 2 Real Application Clusters with Oracle E-Business Suite Release 12 [ID 823587.1]
· Using AutoConfig to Manage System Configurations in Oracle E-Business Suite Release 12 [ID 387859.1]
· Complying with Daylight Saving Time (DST) and Time Zone Rule Changes in E-Business Suite 12 [ID 563019.1]
· Testing your Oracle JVM Time Zone Setup [ID 416860.1]
· Applying the DSTv16 update for the Oracle Database [ID 1319204.1]
· How To Download And Install The Latest OPatch Version [ID 274526.1]
Perform the Application and Database Backup:
Shutdown Applications on all the Application nodes gracefully.
$TNS_ADMIN/admin/scripts/adstpall.sh
Shutdown existing 11gR1 RAC database on all the RAC nodes gracefully.
/u01/app/oracle/EBSR12/bin/srvctl stop database –d LABDB
Shutdown the CRS on all the RAC nodes.
/u01/app/oracle/crs/bin/crsctl stop crs ß as root
appsnode1 and appsnode2
mkdir backup
cd backup
tar cvf appsnode1_R12_backup.tar /u01/app/oracle/ebsR12/* ß on appsnode1
tar cvf appsnode2_R12_backup.tar /u01/app/oracle/ebsR12/* ß on appsnode2
On RAC node1:
mkdir backup
cd backup
-- Backup the OCR and Voting Disk.
dd if=/dev/dev/raw1 of=ocr_disk_10gr2.bkp
dd if=/dev/dev/raw3 of=voting_disk_10gr2.bkp
-- Backup all the HOMEs and CRS related OS Files.
tar cvf node1_crs_10gr2.tar /u01/app/oracle/crs/*
tar cvf node1_asm_10gr2.tar /u01/app/oracle/asm/*
tar cvf node1_db_10gr2.tar /u01/app/oracle/db/*
tar cvf node1_etc_oracle /etc/oracle/*
cp /etc/inittab etc_inittab
mkdir etc_init_d
cd etc_init_d
cp /etc/init.d/init* .
On RAC node2:
mkdir backup
cd backup
tar cvf node2_crs_10gr2.tar /u01/app/oracle/crs/*
tar cvf node2_asm_10gr2.tar /u01/app/oracle/asm/*
tar cvf node2_db_10gr2.tar /u01/app/oracle/db/*
tar cvf node2_etc_oracle /etc/oracle/*
cp /etc/inittab etc_inittab
mkdir etc_init_d
cd etc_init_d
cp /etc/init.d/init* .
On RAC node3:
mkdir backup
cd backup
tar cvf node3_crs_10gr2.tar /u01/app/oracle/crs/*
tar cvf node3_asm_10gr2.tar /u01/app/oracle/asm/*
tar cvf node3_db_10gr2.tar /u01/app/oracle/db/*
tar cvf node3_etc_oracle /etc/oracle/*
cp /etc/inittab etc_inittab
mkdir etc_init_d
cd etc_init_d
cp /etc/init.d/init* .
RMAN Full database backup was taken.
· Install/Upgrade RPMs required for 11gR2 RAC Installation.
· Add SCAN VIPs to the DNS.
· Setup of Network Time Protocol.
· Create 3 ASM Disks to create a diskgroup (Normal Redundancy) to store 11gR2 OCR and Voting Disks.
Minimum Required RPMs for 11gR2 RAC on OEL 5.5 (All the 3 RAC Nodes):
Below command verifies whether the required rpms are installed or not. Any missing rpms can be installed from the OEL Media Pack
rpm -q binutils compat-libstdc++-33 elfutils-libelf elfutils-libelf-devel elfutils-libelf-devel-static \
gcc gcc-c++ glibc glibc-common glibc-devel glibc-headers kernel-headers ksh libaio libaio-devel \
libgcc libgomp libstdc++ libstdc++-devel make numactl-devel sysstat unixODBC unixODBC-devel
I had to install below RPM.
numactl-devel à Located on the 3rd CD of OEL 5.5 Media pack.
[root@node1 ~]# rpm -ivh numactl-devel-0.9.8-11.el5.i386.rpm
warning: numactl-devel-0.9.8-11.el5.i386.rpm: Header V3 DSA signature: NOKEY, key ID 1e5e0159
Preparing... ########################################### [100%]
1:numactl-devel ########################################### [100%]
[root@node1 ~]#
I had to upgrade the cvuqdisk RPM by removing and installing the same with higher version. This step is also taken care by rootupgrade.sh script.
cvuqdisk à Available on Grid Infrastructure Media (under rpm folder)
rpm -e cvuqdisk
export CVUQDISK_GRP=oinstall
echo $CVUQDISK_GRP
rpm -ivh cvuqdisk-1.0.7-1.rpm
Add SCAN VIPs to DNS:
SCAN VIPS to configure in DNS which resolves to lab-scan.hingu.net:
192.168.2.151
192.168.2.152
192.168.2.153
In my existing DNS setup, the below two files were modified with the entry in RED to add these SCAN VIPs into the DNS.
/var/named/chroot/var/named/hingu.net.zone
/var/named/chroot/var/named/2.168.192.in-addr.arpa.zone
/var/named/chroot/var/named/hingu.net.zone
$TTL 1d
hingu.net. IN SOA lab-dns.hingu.net. root.hingu.net. (
100 ; se = serial number
8h ; ref = refresh
5m ; ret = update retry
3w ; ex = expiry
3h ; min = minimum
)
IN NS lab-dns.hingu.net.
; DNS server
lab-dns IN A 192.168.2.200
; Application Nodes Public name
appsnode1 IN A 192.168.2.11
appsnode2 IN A 192.168.2.22
; RAC Nodes Public name
node1 IN A 192.168.2.1
node2 IN A 192.168.2.2
node3 IN A 192.168.2.3
; RAC Nodes Public VIPs
node1-vip IN A 192.168.2.51
node2-vip IN A 192.168.2.52
node3-vip IN A 192.168.2.53
; 3 SCAN VIPs
lab-scan IN A 192.168.2.151
lab-scan IN A 192.168.2.152
lab-scan IN A 192.168.2.153
; Storage Network
nas-server IN A 192.168.1.101
node1-nas IN A 192.168.1.1
node2-nas IN A 192.168.1.2
node3-nas IN A 192.168.1.3
/var/named/chroot/var/named/2.168.192.in-addr.arpa.zone
$TTL 1d
@ IN SOA lab-dns.hingu.net. root.hingu.net. (
100 ; se = serial number
8h ; ref = refresh
5m ; ret = update retry
3w ; ex = expiry
3h ; min = minimum
)
IN NS lab-dns.hingu.net.
; DNS machine name in reverse
200 IN PTR lab-dns.hingu.net.
; Application Nodes Public Name in Reverse
11 IN PTR appsnode1.hingu.net.
22 IN PTR appsnode2.hingu.net.
; RAC Nodes Public Name in Reverse
1 IN PTR node1.hingu.net.
2 IN PTR node2.hingu.net.
3 IN PTR node3.hingu.net.
; RAC Nodes Public VIPs in Reverse
51 IN PTR node1-vip.hingu.net.
52 IN PTR node2-vip.hingu.net.
53 IN PTR node3-vip.hingu.net.
; RAC Nodes SCAN VIPs in Reverse
151 IN PTR lab-scan.hingu.net.
152 IN PTR lab-scan.hingu.net.
153 IN PTR lab-scan.hingu.net.
Restarted the DNS Service (named):
service named restart
NOTE: nslookup for lab-scan should return names in random order every time.
Network Time Protocol Setting (On all the RAC Nodes):
Oracle Time Synchronization Service is chosen to be used over the Linux system provided ntpd. So, ntpd needs to be deactivated and deinstalled to avoid any possibility of it being conflicted with the Oracle’s Cluster Time Sync Service (ctss).
# /sbin/service ntpd stop
# chkconfig ntpd off
# mv /etc/ntp.conf /etc/ntp.conf.org
Also remove the following file:
/var/run/ntpd.pid
Network Service Cache Daemon (all the RAC nodes)
The Network Service Cache Daemon was started on all the RAC nodes.
Service nscd start
Create ASM Disks for diskgroup GIS_FILES to store 11gR2 OCR and Voting Disks
On the rest of the Nodes, it was simply scanned for the new disks.
oracleasm scandisks
· Hide the Existing 11gR1 CRS installation as if there is no Clusterware existed on the RAC Nodes.
· Install 11gR2 Grid Infrastructure under the new GRID_HOME (/u01/app/grid11201)
· Install 11gR2 RAC database software (/u01/app/oracle/db11201).
· Install 11gR2 Example Software (/u01/app/oracle/db11201).
Hide the Existing 11gR1 CRS Installation on RAC Nodes:
In order to install 11gR2 GI, it is required to hide the existing 11gR1 CRS so that 11gR2 GI is installed without any conflict with 11gR1 CRS.
Shutdown CRS on all the RAC nodes
crsctl stop crs
renamed these files/Directories
mv /etc/oracle /etc/oracle_bkp
mkdir /etc/init.d/bkp
mv /etc/init.d/init* /etc/init.d/bkp
removed below lines from the /etc/inittab (the inittab was already backed up in Pre-Upgrade tasks as well)
h1:35:respawn:/etc/init.d/init.evmd run >/dev/null 2>&1 </dev/null
h2:35:respawn:/etc/init.d/init.cssd fatal >/dev/null 2>&1 </dev/null
h3:35:respawn:/etc/init.d/init.crsd run >/dev/null 2>&1 </dev/null
removed the network socket files:
rm -rf /tmp/.oracle
rm -rf /var/tmp/.oracle
rebooted all the RAC nodes at this stage
reboot
NOTE: CRS stack did not come up at this stage because the existing 11gR1 CRS had made hidden.
Install 11gR2 Grid Infrastructure:
Grid Infrastructure installation process:
Installation Option:
Install and Configure Grid Infrastructure for a Cluster
Installation Type:
Advanced Installation
Product Language:
English
Grid Plug and Play:
Cluster Name: lab
SCAN Name: lab-scan.hingu.net
SCAN Port: 1525
Configure GNS: Unchecked
Cluster Node Information:
Entered the Hostname and VIP names of the Cluster Nodes.
Checked the SSH connectivity
Network Interface Usage:
OUI picked up all the interfaces correctly. I did not have to make any changes here.
Storage Option:
Automatic Storage Management (ASM)
Create ASM Disk Group:
Disk Group Name: GIS_FILES
Redundancy: Normal
Candidate Disks: ORCL:GISDSK01, ORCL:GISDSK02, ORCL:GISDSK03
ASM Password:
Use Same Password for these accounts. (Ignored password warnings.)
Failure Isolation:
Do not use Intelligent Platform Management Interface (IPMI)
Operating System Groups:
ASM Database Administrator (OSDBA) Group: dba
ASM Instance Administrator Operator (OSOPER) Group: oinstall
ASM Instance Administrator (OSASM) Group: oinstall
Installation Location:
Oracle Base: /u01/app/oracle
Software Location: /u01/app/grid11201
Create Inventory:
Inventory Directory: /u01/app/oraInventory
Prerequisite Checks:
No issue/Errors
Summary Screen:
Verified the information here and pressed “Finish” to start installation.
At the End of the installation, the root.sh script needed to be executed as root user.
/u01/app/grid11201/root.sh
After the successful completion of this script, the 11g R2 High Availability Service (CRS, CSS and EVMD) started up and running.
Verified that the status of the installation using below set of commands.
crsctl check cluster –all
crs_stat –t –v
crsctl check ctss
The GSD and OC4J resources are by default disabled. Enabled GSD them as below.
srvctl enable nodeapps –g
srvctl start nodeapps –n node1
srvctl start nodeapps –n node2
srvctl start nodeapps –n node3
srvctl enable oc4j
srvctl start oc4j
Next, netca was invoked from 11gR2 Grid Infrastructure Home to reconfigure the listener “LISTENER” from new 11gR2 HOME.
/u01/app/oracle/grid11201/bin/netca
Install 11gR2 RAC Software
Start the runInstaller from 11gR2 Real Application Cluster (RAC) Software Location:
/home/oracle/db11201/database/runInstaller
Real Application Cluster installation process:
Configure Security Updates:
Ignore the “Connection Failed” alert.
Installation Option:
Install database software only
Node Selection:
Selected All the Nodes (node1,node2 and node3)
Product Language:
English
Database Edition:
Enterprise Edition
Installation Location:
Oracle Base: /u01/app/oracle
Software Location: /u01/app/oracle/db11201
Operating System Groups:
Database Administrator (OSDBA) Group: dba
Database Operator (OSOPER) Group: oinstall
Summary Screen:
Verified the information here and pressed “Finish” to start installation.
At the End of the installation, the below scripts needs to be executed on all the nodes as root user.
/u01/app/oracle/db11201/root.sh
Install 11gR2 Example Software:
Start the runInstaller from 11gR2 Example Software Location:
/home/oracle/example/example/runInstaller
Specify Installation Location:
Oracle Base: /u01/app/oracle
Software Location: /u01/app/oracle/db11201
Summary Screen:
Verified the information here and pressed “Finish” to start installation.
· Invoked the asmca from the 11gR2 Grid Infrastructure HOME (/u01/app/grid11201).
· Mount the FRA and DATA diskgroup using ASMCA. This way, asmca moved the DATA and FRA diskgroups to the 11gR2 GI and same time also registered these diskgroups to the OCR.
/u01/app/grid11201/bin/asmca
At this Stage, I tried to start the existing 11gR1 RAC database to confirm that it comes up with no issue as it was then managed by 11gR2 Grid Infrastructure and running on 11gR2 Grid ASM. While Starting the existing 11gR1 RAC database using SQLPLUS, the below error was received. This is because, as per Oracle, 11gR2 has dynamic configuration of cluster and 11gR1 or older releases have static configuration. So, in order to run older version databases on 11gR2 Grid Infrastructure, the cluster configuration needs to be made persistent by pinning the nodes.
ORA-01078: failure in processing system parameters
ORA-01565: error in identifying file '+DATA/labdb/spfilelabdb.ora'
ORA-17503: ksfdopn:2 Failed to open file +DATA/labdb/spfilelabdb.ora
ORA-15077: could not locate ASM instance serving a required diskgroup
ORA-29701: unable to connect to Cluster Manager
/u01/app/grid11201/bin/crsctl pin css –n node1 node2 node3
The LABDB database was then started using existing 11gR1 home through SQLPLUS after pinning the node. Due to the Oracle bug, 11gR1 database was not getting started by srvctl after it was registered to 11gR2 Grid Infrastructure so I had to use SQLPLUS all the time to start/stop the 11gR1 RAC database until it was migrated to 11gR2 RAC.
· Apply the DST RDBMS (DSTv16) Patch to the Existing 11gR1 ORACLE_HOME.
· Apply the DST patch for OJVM component of RDBMS to the 11gR1 HOME.
· Apply the DST RDBMS (DSTv16) Patch to the new 11gR2 ORACLE_HOME.
· Apply the DST patch for OJVM component of RDBMS to the 11gR2 HOME.
· Re-compile the Invalid Objects in the database.
· Purge The RECYCLE BIN.
· Create the required directories to the new 11gR2 RAC HOME.
DST Patch
The below Metalink Notes (563019.1 and 1319204.1) were followed to determine what DST patches were needed in this environment. The required patches were then downloaded and installed (in sequence) in the existing 11gR1 RAC HOME.
· Complying with Daylight Saving Time (DST) and Time Zone Rule Changes in E-Business Suite 12 [ID 563019.1]
· Testing your Oracle JVM Time Zone Setup [ID 416860.1]
· Applying the DSTv16 update for the Oracle Database [ID 1319204.1]
Patch 6880880 (Latest OPatch)
Patch 7695070 (Database Patch -- Prereq Patch for DSTv16 12320006 for 11.1.0.7)
Patch 12320006 (Database Patch -- DSTv16 – for 11.1.0.7 and 11.2.0.1)
Patch 12565410 (Database Patch -- OJVM DSTv16 – for 11.1.0.7 and 11.2.0.1)
The Metalink note 1319204.1 was followed to apply the DSTv16 (database and JVM).
Shutdown the RAC Database LABDB and listener LABDB_LISTENER
srvctl stop listener –l LABDB_LISTENER_NODE1 –n node1
srvctl stop listener –l LABDB_LISTENER_NODE2 –n node2
srvctl stop listener –l LABDB_LISTENER_NODE3 –n node3
shutdown immediate
Patch 6880880 (Latest OPatch)
node1:
ssh node1 mv /u01/app/oracle/db11201/OPatch /u01/app/oracle/db11201/OPatch_orig
ssh node2 mv /u01/app/oracle/db11201/OPatch /u01/app/oracle/db11201/OPatch_orig
ssh node3 mv /u01/app/oracle/db11201/OPatch /u01/app/oracle/db11201/OPatch_orig
cd /u01/app/oracle/db11201
unzip /home/oracle/patches_for_R12_DB_upgrade_to_11gR2/p6880880_112000_LINUX.zip
scp -r OPatch node2:/u01/app/oracle/db11201
scp -r OPatch node3:/u01/app/oracle/db11201
Patch 7695070 (Database Patch -- Prereq Patch for DSTv16 12320006)
. ebslab.env
unzip p7695070_111070_Linux-x86.zip
cd 7695070
/u01/app/oracle/EBSR12/OPatch/opatch apply –local
relink all
The above process was repeated on all the remaining RAC Nodes to install this patch.
Patch 12320006 (DSTv16)
. ebslab.env
unzip p12320006_111070_Linux-x86.zip
cd 12320006
/u01/app/oracle/EBSR12/OPatch/opatch apply -local
The above process was repeated on all the remaining RAC Nodes to install this patch.
Patch 12565410 (DSTv16 OJVM)
. ebslab.env
unzip p12565410_111070_Generic.zip
cd 12565410
/u01/app/oracle/EBSR12/OPatch/opatch apply –local
The above process was repeated on all the remaining RAC Nodes to install this patch.
Then, the below two SQL scripts (fixTZa and fixTZb) were run in order as per the instructions in the same Metalink note 1319204.1.
SQL> @$ORACLE_HOME/javavm/admin/fixTZa
SQL> alter system set cluster_database=false scope=spfile;
SQL> shutdown immediate;
SQL> startup migrate
SQL> $ORACLE_HOME/javavm/admin/fixTZb
SQL> alter system set cluster_database=true scope=spfile sid ='*';
SQL> shutdown immediate;
SQL> startup;
Start the RAC Database LABDB and listener LABDB_LISTENER on all the RAC Nodes
srvctl start listener –l LABDB_LISTENER_NODE1 –n node1
srvctl start listener –l LABDB_LISTENER_NODE2 –n node2
srvctl start listener –l LABDB_LISTENER_NODE3 –n node3
startup
Here is the output of lsinventory after applying the DB patches.
Apply the DST Patches to the newly Installed 11gR2 RAC HOME:
In order to maintain the same DST patch level on the new 11gR2 RAC HOME, the same patches were downloaded for the 11.2.0.1 release and applied using the latest opatch driver.
Patch 6880880 (Latest OPatch)
node1:
ssh node1 mv /u01/app/oracle/db11201/OPatch /u01/app/oracle/db11201/OPatch_orig
ssh node2 mv /u01/app/oracle/db11201/OPatch /u01/app/oracle/db11201/OPatch_orig
ssh node3 mv /u01/app/oracle/db11201/OPatch /u01/app/oracle/db11201/OPatch_orig
cd /u01/app/oracle/db11201
unzip /home/oracle/patches_for_R12_DB_upgrade_to_11gR2/p6880880_112000_LINUX.zip
scp -r OPatch node2:/u01/app/oracle/db11201
scp -r OPatch node3:/u01/app/oracle/db11201
Patch 12320006 (DSTv16)
export ORACLE_HOME=/u01/app/oracle/db11201
unzip p12320006_111070_Linux-x86.zip
cd 12320006
/u01/app/oracle/db11201/OPatch/opatch apply –local
The above process was repeated on all the remaining RAC Nodes to install this patch.
Patch 12565410 (DSTv16 OJVM)
export ORACLE_HOME=/u01/app/oracle/db11201
unzip p12565410_112010_Generic.zip
cd 12565410
/u01/app/oracle/EBSR12/OPatch/opatch apply –local
The above process was repeated on all the remaining RAC Nodes to install this patch.
Create extra directories:
ssh node1 mkdir -p /u01/app/oracle/db11201/appsutil/outbound/LABDB1_node1
ssh node2 mkdir -p /u01/app/oracle/db11201/appsutil/outbound/LABDB2_node2
ssh node3 mkdir -p /u01/app/oracle/db11201/appsutil/outbound/LABDB3_node3
ssh node1 mkdir -p /u01/app/oracle/db11201/admin/LABDB1_node1
ssh node2 mkdir -p /u01/app/oracle/db11201/admin/LABDB2_node2
ssh node3 mkdir -p /u01/app/oracle/db11201/admin/LABDB3_node3
These patches needed to be applied in order to upgrade the 11gR1 EBS R12 Database to 11gR2 RAC. The application was brought down on both the application node gracefully and followed the standard process to apply these patches (i.e, adadmin, adpatch and README.txt).
· Patch 8919489 (12.1 TXK Delta 3)
· Patch 9583541 (Post requirement for the patch 8919489)
· Patch 9062910 (11g Release 2 interoperability patch for Release 12.1)
· Patch 10163753 (Application Patch)
· Patch 11071569 (Application Patch)
· Patch 9738085 (Application Patch -- AutoConfig)
· Patch 9852070 (Application Patch -- AutoConfig)
· Patch 6400501 (Application Patch – 10.1.2 ORACLE_HOME)
Apply Patch 8919289 (EBS R 12.1.3 Techstack Product Release Update Patch):
This patch needs to be applied to use the named listener on the DB tier if it has not been applied during the installation of R12.1.1 on 11gR1 RAC. In my case, this patch has already been applied at the time of installing the R12.1.1 on 11gR1 RAC as I wanted to use the named LISTENER (LABDB_LISTENER).
Here is how it was installed.
a) Applied the patch 8919489 using adpatch by following its README on appsnode1
b) Applied the patch 8919489 using adpatch by following its README on appsnode2
c) Ran the AutoConfig again on Admin Node (appsnode1.hingu.net) after applying the patch on appsnode2.
d) Tried to start the Application on appsnode1.hingu.net and it got warning message saying it could not deploy the latest EAR file.
The Forms were manually deployed by following the Metalink note “Deploying a New forms.ear File in Oracle Applications Release 12 [ID 397174.1]”. While running the script to deploy the forms, it got errored out with the below error message complaining it could not find the opmnctl executable.
cp $INST_TOP/ora/10.1.3/j2ee/forms/config/system-jazn-data.xml $INST_TOP/ora/10.1.3/j2ee/forms/config/system-jazn-data.xml.ori
*******FATAL ERROR*******
PROGRAM : /u01/app/oracle/ebsR12/apps/apps_st/appl/fnd/12.0.0/patch/115/bin/txkCfgOC4JApp.pl(/u01/app/oracle/ebsR12/apps/apps_st/appl/fnd/12.0.0/bin/txkrun.pl)
TIME : Sat Oct 29 13:47:38 2011
FUNCTION: TXK::Process::run [ Level 3 ]
MESSAGES:
Command error: <rc> = 32512, <command> = /u01/app/oracle/ebsR12/apps/tech_st/10.1.3/opmn/bin/opmnctl start
STACK TRACE
TXK::Error::abort('TXK::Error','HASH(0x923639c)') called at /u01/app/oracle/ebsR12/apps/apps_st/appl/au/12.0.0/perl/TXK/Common.pm line 299
TXK::Common::doError('TXK::Process=HASH(0xb7cad114)','Command error: <rc> = 32512, <command> = /u01/app/oracle/ebsR...','undef') called at /u01/app/oracle/ebsR12/apps/apps_st/appl/au/12.0.0/perl/TXK/Common.pm line 314
TXK::Common::setError('TXK::Process=HASH(0xb7cad114)','Command error: <rc> = 32512, <command> = /u01/app/oracle/ebsR...') called at /u01/app/oracle/ebsR12/apps/apps_st/appl/au/12.0.0/perl/TXK/Process.pm line 449
TXK::Process::run('TXK::Process=HASH(0xb7cad114)','HASH(0x9756fe4)') called at /u01/app/oracle/ebsR12/apps/apps_st/appl/fnd/12.0.0/patch/115/bin/txkCfgOC4JApp.pl line 1587
TXK::RunScript::execOPMNControl('HASH(0x9a3b224)') called at /u01/app/oracle/ebsR12/apps/apps_st/appl/fnd/12.0.0/patch/115/bin/txkCfgOC4JApp.pl line 599
require /u01/app/oracle/ebsR12/apps/apps_st/appl/fnd/12.0.0/patch/115/bin/txkCfgOC4JApp.pl called at /u01/app/oracle/ebsR12/apps/apps_st/appl/au/12.0.0/perl/TXK/RunScript.pm line 105
TXK::RunScript::require('TXK::RunScript','/u01/app/oracle/ebsR12/apps/apps_st/appl/fnd/12.0.0/patch/115...') called at /u01/app/oracle/ebsR12/apps/apps_st/appl/au/12.0.0/perl/TXK/Script.pm line 177
eval {...} called at /u01/app/oracle/ebsR12/apps/apps_st/appl/au/12.0.0/perl/TXK/Script.pm line 177
TXK::Script::run('TXK::Script=HASH(0x9b1c980)','/u01/app/oracle/ebsR12/inst/apps/LABDB_appsnode1/logs/appl/rg...','/u01/app/oracle/ebsR12/apps/apps_st/appl/fnd/12.0.0/patch/115...') called at /u01/app/oracle/ebsR12/apps/apps_st/appl/fnd/12.0.0/bin/txkrun.pl line 174
While further debugging, it was found out that the ORACLE_HOME and TNS_ADMIN variables in $IAS_ORACLE_HOME/opmn/bin/opmnctl were pointing to/nfs/bld/d26/PRDXBLD9/apps/tech_st/10.1.3 instead of /u01/app/oracle/ebsR12/apps/tech_st/10.1.3. These variables were correctly modified and then continued with the Note 397174.1 to deploy the forms.ear and after that, it got deployed successfully.
After that, the Application services were started on both the application nodes using $INST_TOP/admin/scripts/adstrtal.sh and tested logging in to the application and forms and the results were all successful.
The application services were brought down after that on both the application nodes to apply the remaining patches next.
Apply the Patches 9062910, 10163753, 11071569, 9738085:
Next, the above mentioned patches were applied using the standard adpatch utility with no issue. These patches have no Pre/post steps.
Apply the Patch 9852070:
After applying this patch using adpatch there are post steps mentioned in the README.txt which were followed to make the appsutil.zip. This file was then shipped to all the RAC nodes where it was unzipped using “unzip -o appsutil.zip” command under the $ORACLE_HOME.
Apply the Patch 6400501 to the ORACLE_HOME (10.1.2):
This patch was downloaded for the version 10.1.0.5 to apply to the ORACLE_HOME 10.1.2 on the application tier using opatch on both the application nodes.
opatch apply
cd $ORACLE_HOME/forms/lib
make -f ins_forms.mk install
cd $ORACLE_HOME/reports/lib
make -f ins_reports.mk install
At this stage, the Application was started on both the nodes to see if they comes up without any issue after applying these patches.
This phase includes the below tasks.
· Create database listener LABDB_LISTENER to the new 11gR2 RAC HOME.
· Upgrade of EBS R12 database from 11gR1 RAC to 11gR2 RAC manually.
Create the Listener “LABDB_LISTENER” in the 11gR2 RAC database Home:
RAC Node 1 (node1.hingu.net):
Point to note here is that, the original LABDB_LISTENER has been existed in the 11gR1 RAC HOME and has been registered in the OCR of 11gR1 Clusterware which is on raw devices. Creating the same listener from 11gR2 RAC HOME did not conflict with the 11gR1 listener because the OCR location of 11gR2 GI is on +GIS_FILES and the 11gR1 LABDB_LISTENER was brought down.
The netca was invoked from the 11gR2 RAC HOME to add the clustered listener LABDB_LISTENER.
export ORACLE_HOME=/u01/app/oracle/db11201
/u01/app/oracle/db11201/bin/netca
Select the “Cluster Configuration”
Select “Listener Configuration”
Select “Add”
Listener Name: LABDB_LISTENER
Selected Protocol: TCP
Port: 1522
Click “Finish”
[oracle@node1 admin]$ pwd
/u01/app/oracle/db11201/network/admin
[oracle@node1 admin]$ ssh node1 mkdir /u01/app/oracle/db11201/network/admin/LABDB1_node1
[oracle@node1 admin]$ ssh node2 mkdir /u01/app/oracle/db11201/network/admin/LABDB2_node2
[oracle@node1 admin]$ ssh node3 mkdir /u01/app/oracle/db11201/network/admin/LABDB3_node3
[oracle@node1 admin]$
Added the TNS_ADMIN entry in the /u01/app/oracle/db11201/bin/racgwrap (11gR2 RAC HOME) file right under the ORACLE_HOME entry.
node1:/u01/app/oracle/db11201/bin/racgwrap
ORACLE_HOME=/u01/app/oracle/db11201
export ORACLE_HOME
export TNS_ADMIN=/u01/app/oracle/dn11201/network/admin/LABDB1_node1
node2:/u01/app/oracle/db11201/bin/racgwrap
ORACLE_HOME=/u01/app/oracle/db11201
export ORACLE_HOME
export TNS_ADMIN=/u01/app/oracle/dn11201/network/admin/LABDB2_node2
node3:/u01/app/oracle/db11201/bin/racgwrap
ORACLE_HOME=/u01/app/oracle/db11201
export ORACLE_HOME
export TNS_ADMIN=/u01/app/oracle/dn11201/network/admin/LABDB3_node3
Copied the tnsnames.ora, listener.ora and their ifiles from the /u01/app/oracle/db11201/network/admin to the above created new TNS_ADMIN
From node1:
ssh node1 cp /u01/app/oracle/db11201/network/admin/tnsnames.ora /u01/app/oracle/db11201/network/admin/LABDB1_node1
ssh node2 cp /u01/app/oracle/db11201/network/admin/tnsnames.ora /u01/app/oracle/db11201/network/admin/LABDB2_node2
ssh node3 cp /u01/app/oracle/db11201/network/admin/tnsnames.ora /u01/app/oracle/db11201/network/admin/LABDB3_node3
ssh node1 cp /u01/app/oracle/db11201/network/admin/LABDB1_node1_ifile.ora /u01/app/oracle/db11201/network/admin/LABDB1_node1
ssh node2 cp /u01/app/oracle/db11201/network/admin/LABDB2_node2_ifile.ora /u01/app/oracle/db11201/network/admin/LABDB2_node2
ssh node3 cp /u01/app/oracle/db11201/network/admin/LABDB3_node3_ifile.ora /u01/app/oracle/db11201/network/admin/LABDB3_node3
ssh node1 cp /u01/app/oracle/db11201/network/admin/listener.ora /u01/app/oracle/db11201/network/admin/LABDB1_node1
ssh node2 cp /u01/app/oracle/db11201/network/admin/listener.ora /u01/app/oracle/db11201/network/admin/LABDB2_node2
ssh node3 cp /u01/app/oracle/db11201/network/admin/listener.ora /u01/app/oracle/db11201/network/admin/LABDB3_node3
Upgrade the database from 11gR1 RAC to 11gR2 RAC:
The below steps were executed in sequence to upgrade 11gR1 RAC EBS R12 database to 11gR2 RAC.
1. Copied the instance specific init files and password files from 11gR1 HOME to 11gR2 RAC Home.
From node1:
ssh node1 cp /u01/app/oracle/EBSR12/dbs/initLABDB1.ora /u01/app/oracle/db11201/dbs
ssh node2 cp /u01/app/oracle/EBSR12/dbs/initLABDB2.ora /u01/app/oracle/db11201/dbs
ssh node3 cp /u01/app/oracle/EBSR12/dbs/initLABDB3.ora /u01/app/oracle/db11201/dbs
2. Created the pfile from the spfile.
3. Removed the obsolete parameters from the pfile (plsql_native_library_dir and plsql_native_library_subdir_count).
4. Modified the below parameters in the pfile.
create pfile='/u01/app/oracle/db11201/dbs/pfile_before_upgrade.txt' from spfile='+DATA/LABDB/spfileLABDB.ora'
cluster_database=false
java_pool_size=67108864
LABDB1.diagnostic_dest='/u01/app/oracle/db11201/admin/LABDB1_node1'
LABDB2.diagnostic_dest='/u01/app/oracle/db11201/admin/LABDB2_node2'
LABDB3.diagnostic_dest='/u01/app/oracle/db11201/admin/LABDB3_node3'
LABDB1.utl_file_dir='/usr/tmp','/usr/tmp','/u01/app/oracle/db11201/appsutil/outbound/LABDB1_node1','/usr/tmp'
LABDB2.utl_file_dir='/usr/tmp','/usr/tmp','/u01/app/oracle/db11201/appsutil/outbound/LABDB2_node2','/usr/tmp'
LABDB3.utl_file_dir='/usr/tmp','/usr/tmp','/u01/app/oracle/db11201/appsutil/outbound/LABDB3_node3','/usr/tmp'
5. Made sure that the SYSAUX tablespace had minimum of 538MB size.
6. Purged the recycle bin using PURGE DBA_RECYCLEBIN
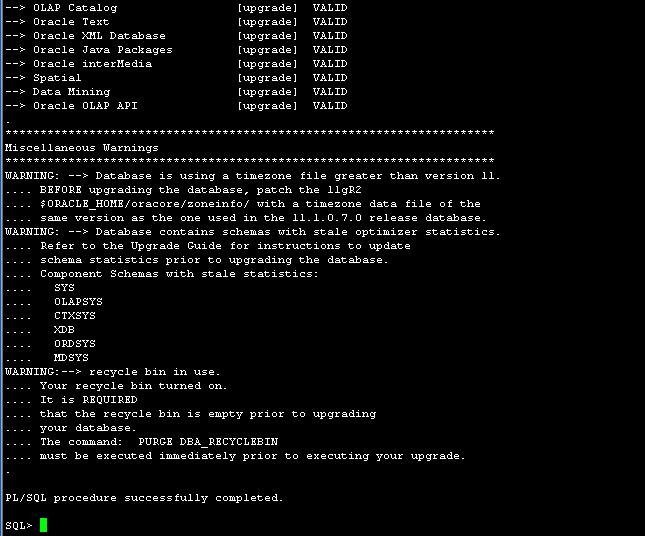
7. Ran the /u01/app/oracle/db11201/rdbms/admin/utlu112i.sql
@/u01/app/oracle/db11201/rdbms/admin/utlu112i
8. Ignored the warning regarding stale statistics.
9. Ignored the warning regarding timezone file greater than version 11 because the new 11gR2 HOME has been patched with the same DST level in the section of “Prepare database for the upgrade (DB Tier)”.
10. Updated the /etc/oratab file and modify the LABDB home to 11gR2 HOME (/u01/app/oracle/db11201).
11. Stopped the database LABDB.
12. Set the environment to the 11gR2 RAC HOME.
13. Started the instance LABDB1 on node1 using UPGRADE option of start command from 11gR2 HOME using the pfile
14. Ran the catupgrd.sql from 11gR2 HOME (/u01/app/oracle/db11201/catupgrd.sql).
export ORACLE_HOME=/u01/app/oracle/db11201
export ORACLE_SID=LABDB1
export PATH=$PATH:$ORACLE_HOME/bin:.
sqlplus / as sysdba
startup upgrade
@/u01/app/oracle/db11201/rdbms/admin/catupgrd
15. Updated the cluster_database to true in pfile.
16. Started the database instance on node1 after the upgrade.
Post-Upgrade Steps:
1. Ran the utlu112s.sql to get the status of the upgrade of each component.
2. Ran the catuppst.sql to perform upgrade actions that do not require database in UPGRADE mode.
3. Ran the utlrp.sql to recompile any INVALID objects
4. Created the spfile from the pfile
@/u01/app/oracle/db11201/rdbms/admin/utlu112s
@/u01/app/oracle/db11201/rdbms/admin/catuppst
@/u01/app/oracle/db11201/rdbms/admin/utlrp
I had to run the catupgrd.sql script 2 times because the first time it failed due to not having enough space in TEMP tablespace. Due to this, running the catupgrd.sql 2nd time was trying to insert the same records in this table failed with the unique constraint violation errors. Based on the Metalink note (ID 1240775.1), these errors are expected when catupgrd.sql runs more than once and can safely be ignored and has no impact on the upgrade process at all.
ORA-00001: unique constraint (SYS.I_STMT_AUDIT_OPTION_MAP) violated
5. Stopped the database LABDB.
6. Added the database LABDB in the OCR.
7. Started the listener LABDB_LISTENER on all the RAC Nodes.
8. Started the database LABDB all the RAC nodes.
sqlplus / as sysdba
shutdown immediate
srvctl add database -d LABDB -m hingu.net -o /u01/app/oracle/db11201 -p +DATA/LABDB/spfileLABDB.ora -y AUTOMATIC -a DATA,FRA
srvctl add instance -d LABDB -i LABDB1 -n node1
srvctl add instance -d LABDB -i LABDB2 -n node2
srvctl add instance -d LABDB -i LABDB3 -n node3
srvctl start listener –l LABDB_LISTENER
srvctl start database –d LABDB
9. Re-create the Custom Database Link (if any).
10. Ran the adgrants.sql
11. Grant “create procedure” to the CTXSYS schema.
12. Set CTXSYS parameter.
13. Validate Workflow ruleset.
From appsnode1:
scp $APPL_TOP/admin/adgrants.sql oracle@node1:
scp $AD_TOP/patch/115/sql/adctxprv.sql oracle@node1:
from node1:
export ORACLE_HOME=/u01/app/oracle/db11201
export ORACLE_SID=LABDB1
export PATH=$PATH:$ORACLE_HOME/bin:.
export TNS_ADMIN=/u01/app/oracle/db11201/network/admin/LABDB1_node1
sqlplus / as sysdba
@adgrants APPS
@adctxprv manager CTXSYS
exec ctxsys.ctx_adm.set_parameter('file_access_role', 'public');
From appsnode1:
sqlplus apps/apps @$FND_TOP/patch/115/sql/wfaqupfix.sql APPLSYS APPS
At this stage, with the old (original) configuration, I started the application on appsnode1 and I was successfully able to login and open the forms with no issue. The database LOCAL_LISTENER and REMOTE_LISTENER was still the same as nothing was changed from connection standpoint except the listener was then running out from 11gR2 RAC HOME instead of 11gR1 RAC. No SCAN was used at this stage.
· Setup appsutil directory under /u01/app/oracle/db11201 HOME.
· Verify the TNS connection to each of the Individual RAC Instances
· Create nls/data/9idata directory
· Delete the FND Node Configuration from the Database.
· Build XML on each RAC node of the DB Tier.
· Run AutoConfig on each RAC node of the DB Tier.
Setup appsutil Directory on All the RAC Nodes.
(1) On the application admin node, appsnode1, the appsutil.zip was generated and copied over to all the DB Tier nodes (node1, node2 and node3) under the /u01/app/oracle/db11201.
Generate the appsutil.zip
[applmgr@appsnode1 ~]$ $AD_TOP/bin/admkappsutil.pl
Starting the generation of appsutil.zip
Log file located at /u01/app/oracle/ebsR12/inst/apps/LABDB_appsnode1/admin/log/MakeAppsUtil_11112117.log
output located at /u01/app/oracle/ebsR12/inst/apps/LABDB_appsnode1/admin/out/appsutil.zip
MakeAppsUtil completed successfully.
copy to all the RAC Nodes FROM appsnode1:
scp /u01/app/oracle/ebsR12/inst/apps/LABDB_appsnode1/admin/out/appsutil.zip oracle@node1:/u01/app/oracle/db11201
scp /u01/app/oracle/ebsR12/inst/apps/LABDB_appsnode1/admin/out/appsutil.zip oracle@node2:/u01/app/oracle/db11201
scp /u01/app/oracle/ebsR12/inst/apps/LABDB_appsnode1/admin/out/appsutil.zip oracle@node3:/u01/app/oracle/db11201
unzip the appsutil.zip on all the RAC Nodes:
cd /u01/app/oracle/db11201
unzip –o appsutil.zip
(2) The jre directory was copied from the 11GR1 HOME (/u01/app/oracle/EBSR12/appsutil/jre) to the 11gR2 RAC HOME (/u01/app/oracle/db11201/appsutil) on all the nodes.
ssh node1 cp –r /u01/app/oracle/EBSR12/appsutil/jre /u01/app/oracle/db11201/appsutil
ssh node2 cp –r /u01/app/oracle/EBSR12/appsutil/jre /u01/app/oracle/db11201/appsutil
ssh node3 cp –r /u01/app/oracle/EBSR12/appsutil/jre /u01/app/oracle/db11201/appsutil
The Instance Connectivity from each of the RAC instances was verified using SQLPLUS from RAC nodes individually. I would not run adconfig.pl without having successful connection to each of the RAC instances.
RAC Instance Connections Verification:
The Instance Connectivity from each of the RAC instances was verified using SQLPLUS from RAC nodes individually. The connectivity was confirmed before running the adconfig.pl on each of the RAC instances.
node1:
export ORA_NLS10=/u01/app/oracle/db11201/nls/data/9idata
export ORACLE_HOME=/u01/app/oracle/db11201
export ORACLE_SID=LABDB1
export TNS_ADMIN=/u01/app/oracle/db11201/network/admin/LABDB1_node1
export LD_LIBRARY_PATH=/u01/app/oracle/db11201/lib:/u01/app/oracle/db11201/ctx/lib
export PATH=$ORACLE_HOME/bin:$PATH:.
sqlplus apps/apps@LABDB1
Repeated the above process for all the RAC Instances.
Create the nls/data/9idata Directory
On all the RAC Nodes, ran the /u01/app/oracle/db11201/nls/data/old/cr9idata.pl script to create the /u01/app/oracle/db11201/nls/data/9idata directory. Without this directory, the adconfig.sh on DB tier may fail on this.
[oracle@node1 db11201]$ cd /u01/app/oracle/db11201/nls/data/old/
[oracle@node1 old]$ perl cr9idata.pl
Creating directory /u01/app/oracle/db11201/nls/data/9idata ...
Copying files to /u01/app/oracle/db11201/nls/data/9idata...
Copy finished.
Please reset environment variable ORA_NLS10 to /u01/app/oracle/db11201/nls/data/9idata!
Clean the current Configuration in the Database
SQL> exec fnd_conc_clone.setup_clean;
Build XML (on All the RAC Nodes):
Ran the /u01/app/oracle/db11201/appsutil/bin/adbldxml.pl to build the XML on each of the RAC Nodes and provided the appropriate values of DB Host Name, Database Port, SID, and Service Name. This will generate the context file <SID>_hostname.xml under /u01/app/oracle/db11201/appsutil.
On node1:
[oracle@node1 bin]$ adbldxml.pl
Starting context file generation for db tier..
Using JVM from /u01/app/oracle/db11201/jdk/jre/bin/java to execute java programs..
APPS Password: apps
The log file for this adbldxml session is located at:
/u01/app/oracle/db11201/appsutil/log/adbldxml_11112333.log
AC-20010: Error: File - listener.ora could not be found at the location:
/listener.ora
indicated by TNS_ADMIN. Context file can not be generated.
Could not Connect to the Database with the above parameters, Please answer the Questions below
Enter Hostname of Database server: node1
Enter Port of Database server: 1522
Enter SID of Database server: LABDB1
Enter Database Service Name: LABDB
Enter the value for Display Variable: 1
The context file has been created at:
/u01/app/oracle/db11201/appsutil/LABDB1_node1.xml
Once the context file got generated, the below variables were modified (in RED) to their appropriate values.
On node1’s xml file:
<!-- host information -->
<oa_host>
<host oa_var="s_hostname">node3</host>
<host oa_var="s_virtual_hostname">node1-vip</host>
<private_address oa_var="s_clusterInterConnects">node1-prv</private_address>
<domain oa_var="s_domainname">hingu.net</domain>
...
...
<DB_LISTENER oa_var="s_db_listener">LABDB_LISTENER</DB_LISTENER>
Repeated the same process on all the remaining nodes and modified the XML files as shown above with their node specific values.
Run autoconfig on all the RAC nodes one by one:
Ran the Autoconfig on all the RAC nodes separately using the script /u01/app/oracle/db11201/appsutil/bin/adconfig.sh.
On node1:
export ORA_NLS10=/u01/app/oracle/db11201/nls/data/9idata
export ORACLE_HOME=/u01/app/oracle/db11201
export ORACLE_SID=LABDB1
export TNS_ADMIN=/u01/app/oracle/db11201/network/admin/LABDB1_node1
export LD_LIBRARY_PATH=/u01/app/oracle/db11201/lib:/u01/app/oracle/db11201/ctx/lib
export PATH=$ORACLE_HOME/bin:$PATH:.
cd /u01/app/oracle/db11201/appsutil/bin
./adconfig.sh
Similarly, the AutoConfig was ran on the remaining RAC nodes after setting the node specific environment variable.
Then, the autoconfig was again ran on all the RAC Nodes in the reverse order so that all the nodes’ tnsnames.ora file contains the same information.
/u01/app/oracle/db11201/appsutil/scripts/LABDB3_node3/adautocfg.sh ß on node3
/u01/app/oracle/db11201/appsutil/scripts/LABDB2_node2/adautocfg.sh ß on node2
/u01/app/oracle/db11201/appsutil/scripts/LABDB1_node1/adautocfg.sh ß on node1
At the end, the listener ifile was created on all the RAC Nodes by copying the listener.ora content to the ifile.
node1:
ssh node1 cp /u01/app/oracle/db11201/network/admin/LABDB1_node1/listener.ora /u01/app/oracle/db11201/network/admin/LABDB1_node1/listener_ifile.ora
ssh node2 cp /u01/app/oracle/db11201/network/admin/LABDB2_node2/listener.ora /u01/app/oracle/db11201/network/admin/LABDB2_node2/listener_ifile.ora
ssh node3 cp /u01/app/oracle/db11201/network/admin/LABDB3_node3/listener.ora /u01/app/oracle/db11201/network/admin/LABDB3_node3/listener_ifile.ora
Modify the $ORACLE_HOME/dbs/<SID>_APPS_BASE.ora on all the RAC Nodes:
The <SID>_APPS_BASE.ora file under the /u01/app/oracle/db11201/dbs contains the wrong values for the control_files parameter. So, this file was modified on all the RAC nodes with the correct value of control_files parameter (select name from v$controlfile)
control_files = '+DATA/labdb/controlfile/current.267.765911037','+FRA/labdb/controlfile/current.263.765911059'
At this stage, the FND Nodes contained the RAC nodes information in the application database.
After enabling and running the AutoConfig successfully on the DB tier RAC nodes, it is required to run the autoconfig on all the Application nodes so that they can generate the new RAC specific TNS and jdbc_url entry. I followed the below steps to accomplish this requirement.
· Check the connection to the database before running the AutoConfig and the result should be successful as the LISTENER port on DB Tier was remained unchanged.
· Run the AutoConfig on the application nodes.
· Re-run the AutoConfig on the Admin Node (appsnode1) --- reverse order.
· Start the Application services on both the application nodes.
Run the AutoConfig on appsnode1:
$AD_TOP/bin/adconfig.sh contextfile=/u01/app/oracle/ebsR12/inst/apps/LABDB_appsnode1/appl/admin/LABDB_appsnode1.xml
After successful completion of autoconfig and re-sourcing the environment, the $TNS_ADMIN/tnsnames.ora file was containing the tns aliases for all the RAC instances individually and also had a BALANCE entry containing all the DB VIPs as shown below:
LABDB_BALANCE=
(DESCRIPTION=
(ADDRESS_LIST=
(LOAD_BALANCE=YES)
(FAILOVER=YES)
(ADDRESS=(PROTOCOL=tcp)(HOST=node2-vip.hingu.net)(PORT=1522))
(ADDRESS=(PROTOCOL=tcp)(HOST=node1-vip.hingu.net)(PORT=1522))
(ADDRESS=(PROTOCOL=tcp)(HOST=node3-vip.hingu.net)(PORT=1522))
)
(CONNECT_DATA=
(SERVICE_NAME=LABDB)
)
)
The new jdbc_url in the CONTEXT_FILE on appsnode1 was reflecting all the 3 VIPs of database RAC nodes at this stage.
Run the Autoconfig on appsnode2:
Same way, I ran the autoconfig on the appsnode2 and started the application services on both the nodes.
$AD_TOP/bin/adconfig.sh contextfile=/u01/app/oracle/ebsR12/inst/apps/LABDB_appsnode2/appl/admin/LABDB_appsnode2.xml
Re-Run the AutoConfig on appsnode2 and appsnode1:
I re-ran the autoconfig on these nodes using the below command.
$INST_TOP/admin/scripts/adautocfg.sh
Tested the login page and verified the Nodes information in the OAM as well as database.
Start the application services on appsnode2 and appsnode1:
The application services were started on both the apps nodes at this stage.
$INST_TOP/admin/scripts/adstrtal.sh
The login page was successfully displayed and was able to login to the application and forms successfully.
FND Nodes Configuration:
At this stage, the configuration has 5 nodes total, 3 are DB nodes and 2 are application nodes.
Application Specific Database Post-Upgrade Steps.
The Metalink note 1058763.1 was followed to achieve the below tasks.
(a) Gather statistics for the SYS schema.
From appsnode1:
scp $APPL_TOP/admin/adstats.sql oracle@node1:
from node1:
export ORACLE_HOME=/u01/app/oracle/db11201
export ORACLE_SID=LABDB1
export PATH=$PATH:$ORACLE_HOME/bin:.
export TNS_ADMIN=/u01/app/oracle/db11201/network/admin/LABDB1_node1
sqlplus / as sysdba
alter system enable restricted session;
@adstats
alter system disable restricted session;
(b) Create Dementra Privileges.
In my case, the Dementra was not set up. But in case if there is, the Metalink Note 1091083.1 should be followed to create Dementra previliges.
(c) Re-Create Custom Database Links.
Not applicable in my case as the listener port remained same from 11gR1 to 11gR2 after the upgrade. Otherwise, the DB links should be recreated with the proper Port information
(d) Re-create grants and synonyms.
On the administration server node, as APPS, ran AD Administration and selected the "Recreate grants and synonyms for APPS schema" task from the Maintain Applications Database Entities menu.
(e) Synchronize workflow.
Logged on to Oracle E-Business Suite with the "System Administrator" responsibility. Clicked Requests > Run > Single Request and the OK button. Entered the following parameters:
Request Name = Workflow Directory Services User/Role Validation
P_BatchSize = 10000
p_Check_Dangling = Yes
Add missing user/role assignments = Yes
Update WHO columns in WF tables = No
Click "OK" and "Submit".
Verified the OS processes on both the application nodes to confirm that the enabled services are started and running successfully.
Logged in to the Application using login page url.
http://appsnode1.hingu.net:8001/OA_HTML/AppsLogin
Verified that the Concurrent Managers are started and running on the Concurrent Node (appsnode2.hingu.net)
OAM Configuration:
(a) listnener.ora, tnsnames.ora, sqlnet.ora and their ifiles from all the RAC nodes.
(b) listnener.ora and tnsnames.ora from both the application nodes.
(c) CONTEXT_FILE from all the 5 nodes.
(d) Pfile of the RAC database.