This Document shows the step by step of installing and setting up 2-Node E-Business Suites R 12.1.1 running on 11gR1 RAC database managed by 11gR2 Grid Infrastructure.
Below installation roadmap was followed (in sequence) to set up Multi-Node EBS R12 Application running on Multi-Node RAC Database.
(a) Install and Setup 11gR2 (11.2.0.1) Grid Infrastructure on 3-node cluster.
(b) Create the ASM Diskgroups DATA and FRA with sufficient size.
(c) Install the 11gR1 RAC Software for the Database Home (11.1.0.6) on this Cluster.
(d) Install 11gR1 (11.1.0.6) Example Software to the 11gR1 DB Home.
(e) Apply the 11gR1 (11.1.0.7) PatchSet on top of the 11.1.0.6 DB Home.
(f) Prepare the Application Nodes (Pre-Install Tasks) for Installation.
(g) Install EBS R12.1.1 using Rapid Install on Database Node 1 (Out of the BOX Non-RAC installation on RAC Node 1).
(h) Install EBS R12.1.1 using Rapid Install on Apps Node 1.
(i) Install EBS R12.1.1 using Rapid Install on Apps Node 2.
(j) Apply the EBS Techstack 12.1.3 Product Release Update Patch (9819489) on the Apps Nodes.
(k) Convert the non-RAC 11gR1 database to RAC Database.
(l) Enable and run the Autoconfig on the DB Tier for the 11gR1 RAC HOME.
(m) Run the AutoConfig on the APPS Tier to generate the new RAC enabled connect strings.
(n) Take the Complete Backup of the Entire System.
(o) Check whether the enabled services on application nodes are running appropriately.
(p) Login to the application Login Page to see if login to the application is successful.
(q) Open Forms (like Concurrent Manager) to see if forms are opening up successfully.
(r) Verify the Configuration in OAM.
(t) listnener.ora and tnsnames.ora from both the application nodes.
(u) CONTEXT_FILE from all the 5 nodes.
(v) Pfile of the RAC database.
Node Type
|
NAME
|
Version
|
Function
|
Application Node1
|
appsnode1.hingu.net
|
Oracle EBS 12.1.1
|
WEB Node
|
Application Node2
|
appsnode2.hingu.net
|
Oracle EBS 12.1.1
|
Concurrent Node (Batch Processing)
|
RAC DB Node1
|
node1.hingu.net
|
Oracle RDBMS 11.1.0.7
|
Clustered DB node1
|
RAC DB Node2
|
node2.hingu.net
|
Oracle RDBMS 11.1.0.7
|
Clustered DB node2
|
RAC DB Node3
|
node3.hingu.net
|
Oracle RDBMS 11.1.0.7
|
Clustered DB node3
|
DNS Server
|
lab-dns.hingu.net
|
OEL 5.5
|
DNS
|
|
Apps Tier
|
E-Business Suite
|
Oracle EBS R12.1.1
|
BASE Directory
|
/u01/app/oracle/ebsR12
|
ORACLE_HOME
|
/u01/app/oracle/ebsR12/apps/tech_st/10.1.2
|
IAS_ORACLE_HOME
|
/u01/app/oracle/ebsR12/apps/tech_st/10.1.3
|
APPL_TOP
|
/u01/app/oracle/ebsR12/apps/apps_st/appl
|
INST_TOP
|
/u01/app/oracle/ebsR12/inst/apps/<CONTEXT_NAME>
|
Port Pool
|
1
|
Application OS Owner
|
applmgr:(oinstall, dba)
|
OS Platform
|
Oracle Enterprise Linux 5.5 (32 bit)
|
|
DB Tier
|
RDBMS
|
Oracle 11gR1 RAC (11.1.0.7)
|
ORACLE_BASE
|
/u01/app/oracle
|
ORACLE_HOME
|
/u01/app/oracle/EBSR12
|
DB_HOME Owner
|
oracle:(oinstall, dba)
|
DB LISTENER
|
LABDB_LISTENER
|
DB Listener Host/port
|
node1-vip, node2-vip, node3-vip (TCP:1522)
|
DB Storage Type, File Management
|
ASM with OMFs
|
ASM diskgroups for DB and FRA
|
DATA (60GB), FRA (10GB)
|
OS Platform
|
Oracle Enterprise Linux 5.5 (32 bit)
|
Clusterware
|
Oracle 11gR2 Grid Infrastructure 11.2.0.1
|
ASM
|
Oracle 11gR2 Grid Infrastructure 11.2.0.1
|
Cluster Name
|
lab
|
Database Cluster Nodes
|
node1, node2, node3
|
Clusterware Home
|
/u01/app/grid11201 (GRID_HOME)
|
Clusterware Owner
|
oracle:(oinstall, dba)
|
VIPs
|
node1-vip, node2-vip, node3-vip
|
SCAN
|
lab-scan.hingu.net
|
SCAN VIPs
|
3 SCAN VIPs resolving lab-scan.hingu.net by DNS
|
SCAN_LISTENER Host/port
|
Scan VIPs Endpoint: (TCP:1525)
|
OCR and Voting Disks Storage Type
|
ASM
|
OCR Disks/Voting Disk
|
+GIS_FILES (Normal Redundancy)
|
ASM_HOME
|
/u01/app/grid11201
|
ASM_HOME Owner
|
oracle:(oinstall, dba)
|
ASMLib user:group
|
oracle:oinstall
|
ASM LISTENER
|
LISTENER (TCP:1521)
|
Oracle Enterprise Linux 5.5 (2.6.18-194.el5PAE)
Oracle E-Business Suites 12.1.1
Oracle 11g R2 Grid Infrastructure (11.2.0.1)
Oracle Database 11g R1 (11.1.0.6)
Oracle Database example software 11g R1 (11.1.0.6)
Oracle Database PatchSet (11.1.0.7)
Oracle EBS 12.1 RUP 3 (R12.TXK.B.delta 3 Patch 8919489)
Documents/Notes Reviewed and Followed:
· Oracle Applications Install Guide: Using Rapid Install (Part No. E12842-02)
· Oracle E-Business Suite Installation and Upgrade Notes Release 12 (12.1.1) for Linux x86 [ID 761564.1]
· Using Oracle 11g Release 1 (11.1.0.7) Real Application Clusters and Automatic Storage Management with Oracle E-Business Suite Release 12 [ID 466649.1]
· Using AutoConfig to Manage System Configurations in Oracle E-Business Suite Release 12 [ID 387859.1]
In this phase, the 3-node 11gR2 Grid Infrastructure was installed with the below information by following my note on “Installing 11gR2 RAC on Linux”.
There, I had created ASM Diskgroups DATA and FRA with the size of 60G and 10G respectively.
Grid Infrastructure Software (Clusterware + ASM 11.2.0.1):
Server: All the RAC Nodes
ORACLE_BASE: /u01/app/oracle
ORACLE_HOME: /u01/app/grid11201
Owner: oracle (Primary Group: oinstall, Secondary Group: dba)
Permissions: 755
OCR/Voting Disk Storage Type: ASM
Oracle Inventory Location: /u01/app/oraInventory
Install 11gR1 RAC HOME:
The EBS R 12.1.1 software comes with the default database version 11.1.0.7. So, I had to create the RAC HOME with the same patch level as the seeded Home. The below database software were downloaded from Oracle’s Website and installed them in the order listed by creating the new 11gR1 RAC (11.1.0.7) HOME /u01/app/oracle/EBSR12.
The Installation type was selected as “Software Only”.
Oracle Database 11g R1 (11.1.0.6)
Oracle Database example software 11g R1 (11.1.0.6)
Oracle Database PatchSet (11.1.0.7)
· Linux Package Requirement
· Apply Oracle Patch 6078836 to copy the Missing Library on Linux
· Network Setup
· Creating Application Software owners/Groups/Permissions
· Setup E-Business Suites Software Owner’s (applmgr) Environment
· Setting up SSH equivalency for OS user applmgr
· Download and Stage the R12 Software.
compat-glibc-2.3.4-2.26
compat-glibc-headers-2.3.4-2.26
gcc-4.1.2-14.el5
gcc-c++-4.1.2-14.el5
glibc-2.5-123
glibc-common-2.5-123
glibc-devel-2.5-12
glibc-headers-2.5-12
kernel-headers-2.6.18-128.el5
libgcc-4.1.2-14.el53
libstdc++-devel-4.1.2-14.el5
libstdc++-4.1.2-14.el53
make-3.81-1.13
gdbm-1.8.0-26.2.13
libXp-1.0.0-8.1.el5
libaio-0.3.106-3.23
libgomp-4.1.2-14.el5
sysstat-7.0.0-3.el5
compat-libstdc++-296-2.96-138
compat-libstdc++-33-3.2.3-61
openmotif21-2.1.30-11.EL5.i386 ß available from http://oss.oracle.com/projects/compat-oracle/files/Enterprise_Linux
xorg-x11-libs-compat-6.8.2-1.EL.33.0.1.i386 ß available from above link
Below command verifies whether the specified rpms are installed or not. Any missing rpms can be installed from the OEL Media Pack
rpm -q compat-glibc compat-glibc-headers gcc gcc-c++ glibc glibc-common glibc-devel glibc-headers \
kernel-headers libgcc libstdc++ libstdc++-devel make gdbm libXp libaio libgomp libaio-devel sysstat \
compat-libstdc++-296 compat-libstdc++-33 openmotif21 xorg-x11-libs-compat
The following maintenance tools must be installed on each of the APPS nodes.
[root@appsnode2 ~]# which ar
/usr/bin/ar
[root@appsnode2 ~]# which gcc
/usr/bin/gcc
[root@appsnode2 ~]# which g++
/usr/bin/g++
[root@appsnode2 ~]# which ld
/usr/bin/ld
[root@appsnode2 ~]# which ksh
/bin/ksh
[root@appsnode2 ~]# which make
/usr/bin/make
[root@appsnode2 ~]# which X
/usr/bin/X
Apply patch 6078836 to copy the missing library (All the Application Nodes):
This patch comes with a file libdb.so.2 which was manually copied to /usr/lib on both the Application Nodes.
(a) hostname:
For Apps Node node1:
appsnode1.hingu.net: /etc/sysconfig/network
NETWORKING=yes
NETWORKING_IPV6=yes
HOSTNAME=appsnode1.hingu.net
For Apps Node node2:
appsnode2.hingu.net: /etc/sysconfig/network
NETWORKING=yes
NETWORKING_IPV6=yes
HOSTNAME=appsnode2.hingu.net
(b) Public Network:
appsnode1.hingu.net: /etc/sysconfig/network-scripts/ifcfg-eth2
# Broadcom Corporation NetXtreme BCM5751 Gigabit Ethernet PCI Express
DEVICE=eth2
BOOTPROTO=static
BROADCAST=192.168.2.255
HWADDR=00:13:72:A1:E9:1B
IPADDR=192.168.2.11
IPV6INIT=yes
IPV6_AUTOCONF=yes
NETMASK=255.255.255.0
NETWORK=192.168.2.0
ONBOOT=yes
appsnode2.hingu.net: /etc/sysconfig/network-scripts/ifcfg-eth2
# Broadcom Corporation NetXtreme BCM5751 Gigabit Ethernet PCI Express
DEVICE=eth2
BOOTPROTO=static
BROADCAST=192.168.2.255
HWADDR=00:14:22:5C:B0:A0
IPADDR=192.168.2.22
IPV6INIT=yes
IPV6_AUTOCONF=yes
NETMASK=255.255.255.0
NETWORK=192.168.2.0
ONBOOT=yes
(e) /etc/hosts files (Same on both the Application Nodes):
/etc/hosts
# Do not remove the following line, or various programs
# that require network functionality will fail.
127.0.0.1 localhost.localdomain localhost
::1 localhost6.localdomain6 localhost6
##=======================================
# Public Network
##=======================================
192.168.2.11 appsnode1.hingu.net appsnode1
192.168.2.22 appsnode2.hingu.net appsnode2
192.168.2.1 node1.hingu.net node1
192.168.2.2 node2.hingu.net node2
192.168.2.3 node3.hingu.net node3
##=======================================
##=======================================
Enable Name Service Cache Daemon nscd: (On all the Apps Nodes)
chkconfig --level 35 nscd on
service ncsd start
groupadd -g 1000 oinstall
groupadd –g 1031 dba
useradd -u 3100 -g oinstall –G dba applmgr
mkdir -p /u01
chown –R applmgr:oinstall /u01
chmod -R 775 /u01
passwd applmgr
(a) Set the umask to 022 by putting below line into applmgr’s .bash_profile files:
umask 022
Then, executed the .bash_profile and verified that the correct value of umask is displayed.
[grid@node1 ~]$ . .bash_profile
[grid@node1 ~]$ umask
(b) Setting up X11 forwarding:
Created the file ~/.ssh/config to disable the X11Forwadding by placing below line in it.
Host *
ForwardX11 no
(c) Suppressed the Terminal output on STDOUT and STDERR to prevent Installation errors:
Modified the file ~/.bashrc (or .cshrc for C shell) with below entry.
Bourne, Bash, or Korn shell:
if [ -t 0 ]; then
stty intr ^C
fi
C shell:
test -t 0
if ($status == 0) then
stty intr ^C
endif
(d) Increased the Shell Limits:
Recommended:
Resource
|
Soft Limit
|
Hard Limit
|
Processes
|
2047
|
16384
|
Open File Descriptors
|
1024
|
65536
|
Stack
|
10240
|
10240 - 32768
|
Set:
Resource
|
Soft Limit
|
Hard Limit
|
Processes
|
131072
|
131072
|
Open File Descriptors
|
131072
|
131072
|
Stack
|
32768
|
32768
|
Added the following lines to the /etc/security/limits.conf file:
applmgr soft nofile 131072
applmgr hard nofile 131072
applmgr soft nproc 131072
applmgr hard nproc 131072
applmgr soft core unlimited
applmgr hard core unlimited
applmgr soft memlock 3500000
applmgr hard memlock 3500000
# Recommended stack hard limit 32MB for applmgr installations
# applmgr hard stack 32768
Added the following line in the /etc/pam.d/login file, if it does not already exist:
session required /lib/security/pam_limits.so
For the Bourne, Bash, or Korn shell, add the following lines to the /etc/profile:
if [ $USER = "applmgr" ]; then
if [ $SHELL = "/bin/ksh" ]; then
ulimit -p 131072
ulimit -n 131072
else
ulimit -u 131072 -n 131072
fi
fi
For the C shell (csh or tcsh), add the following lines to the /etc/csh.login.
if ( $USER == "applmgr" ) then
limit maxproc 131072
limit descriptors 131072
endif
(e) Set the below Kernel Parameters with recommended range in /etc/sysctl.conf
/etc/sysctl.conf
kernel.shmmax = 4294967295
# Controls the maximum number of shared memory segments, in pages
kernel.shmall = 1073741824
# Controls the maximum size of a message, in bytes
kernel.msgmnb = 65536
# Controls the default maxmimum size of a mesage queue
kernel.msgmax = 8192
kernel.msgmni = 2878
# For 11g, recommended value for file-max is 6815744
fs.file-max = 6815744
kernel.sem = 250 32000 100 142
kernel.shmmni = 4096
net.core.rmem_default = 262144
net.core.rmem_max = 4194304
net.core.wmem_default = 262144
net.core.wmem_max = 262144
net.ipv4.ip_local_port_range = 10000 65500
(f) Repeated this process for the second app node appsnode2.hingu.net.
This step is not required but I would always set up the ssh user equivalency for ease of maintenance.
On All the Apps Nodes:
su - applmgr
mkdir ~/.ssh
chmod 700 ~/.ssh
Generate the RSA and DSA keys:
/usr/bin/ssh-keygen -t rsa
/usr/bin/ssh-keygen -t dsa
On appsnode1:
touch ~/.ssh/authorized_keys
cd ~/.ssh
(a) Add these Keys to the Authorized_keys file.
cat id_rsa.pub >> authorized_keys
cat id_dsa.pub >> authorized_keys
(b) Send this file to appsnode2.
scp authorized_keys appsnode2:.ssh/
On appsnode2:
(a) Add these Keys to the Authorized_keys file.
cd ~/.ssh
cat id_rsa.pub >> authorized_keys
cat id_dsa.pub >> authorized_keys
(b) Send this file to appsnode1.
scp authorized_keys appsnode1:.ssh/
On both the Apps Nodes:
chmod 600 ~/.ssh/authorized_keys
ssh appsnode1 date
ssh appsnode2 date
ssh appsnode1.hingu.net date
ssh appsnode2.hingu.net date
Entered 'yes' and continued when prompted
Download and Stage the R12 Software on one of APPS as well as DB Node:
(1) Downloaded the E-Business Suite software Release 12.1.1 from otn.oracle.com and copied them to the /tmp directory as shown here.
(2) Created the Staging Directory /u01/StageR12 to stage the R12 Software.
(3) Created the script called /u01/StageR12/unzip.sh to unzip the downloaded software to the Stage Directory.
mkdir /u01/StageR12
cd /u01/StageR12
for i in `ls -1 /tmp/R12_for_Linux/*/*.zip`; do echo unzip $i; done > unzip.sh
for i in `ls -1 /tmp/R12_for_Linux/*/*/*.zip`; do echo unzip $i; done >> unzip.sh
chmod 755 unzip.sh
[applmgr@appsnode1 StageR12]$ cat unzip.sh
unzip /tmp/R12_for_Linux/Start/B53824-01_1of4.zip
unzip /tmp/R12_for_Linux/Start/B53824-01_2of4.zip
unzip /tmp/R12_for_Linux/Start/B53824-01_3of4.zip
unzip /tmp/R12_for_Linux/Start/B53824-01_4of4.zip
unzip /tmp/R12_for_Linux/APPL_TOP/DVD1/V15573-01_1of3.zip
unzip /tmp/R12_for_Linux/APPL_TOP/DVD1/V15573-01_2of3.zip
unzip /tmp/R12_for_Linux/APPL_TOP/DVD1/V15573-01_3of3.zip
unzip /tmp/R12_for_Linux/APPL_TOP/DVD2/V15574-01_1of3.zip
unzip /tmp/R12_for_Linux/APPL_TOP/DVD2/V15574-01_2of3.zip
unzip /tmp/R12_for_Linux/APPL_TOP/DVD2/V15574-01_3of3.zip
unzip /tmp/R12_for_Linux/Databases/DVD1/V15564-01_1of3.zip
unzip /tmp/R12_for_Linux/Databases/DVD1/V15564-01_2of3.zip
unzip /tmp/R12_for_Linux/Databases/DVD1/V15564-01_3of3.zip
unzip /tmp/R12_for_Linux/Databases/DVD2/V15565-01_1of2.zip
unzip /tmp/R12_for_Linux/Databases/DVD2/V15565-01_2of2.zip
unzip /tmp/R12_for_Linux/Databases/DVD3/V15566-01_1of3.zip
unzip /tmp/R12_for_Linux/Databases/DVD3/V15566-01_2of3.zip
unzip /tmp/R12_for_Linux/Databases/DVD3/V15566-01_3of3.zip
unzip /tmp/R12_for_Linux/Databases/DVD4/V15567-01_1of3.zip
unzip /tmp/R12_for_Linux/Databases/DVD4/V15567-01_2of3.zip
unzip /tmp/R12_for_Linux/Databases/DVD4/V15567-01_3of3.zip
unzip /tmp/R12_for_Linux/Databases/DVD5/V15568-01_1of3.zip
unzip /tmp/R12_for_Linux/Databases/DVD5/V15568-01_2of3.zip
unzip /tmp/R12_for_Linux/Databases/DVD5/V15568-01_3of3.zip
unzip /tmp/R12_for_Linux/Databases/DVD6/V15569-01_1of3.zip
unzip /tmp/R12_for_Linux/Databases/DVD6/V15569-01_2of3.zip
unzip /tmp/R12_for_Linux/Databases/DVD6/V15569-01_3of3.zip
unzip /tmp/R12_for_Linux/Databases/DVD7/V15570-01_1of3.zip
unzip /tmp/R12_for_Linux/Databases/DVD7/V15570-01_2of3.zip
unzip /tmp/R12_for_Linux/Databases/DVD7/V15570-01_3of3.zip
unzip /tmp/R12_for_Linux/Databases/DVD8/V15571-01_1of3.zip
unzip /tmp/R12_for_Linux/Databases/DVD8/V15571-01_2of3.zip
unzip /tmp/R12_for_Linux/Databases/DVD8/V15571-01_3of3.zip
unzip /tmp/R12_for_Linux/Databases/DVD9/V15572-01_1of3.zip
unzip /tmp/R12_for_Linux/Databases/DVD9/V15572-01_2of3.zip
unzip /tmp/R12_for_Linux/Databases/DVD9/V15572-01_3of3.zip
unzip /tmp/R12_for_Linux/RDBMS/DVD1/V15576-01_1of3.zip
unzip /tmp/R12_for_Linux/RDBMS/DVD1/V15576-01_2of3.zip
unzip /tmp/R12_for_Linux/RDBMS/DVD1/V15576-01_3of3.zip
unzip /tmp/R12_for_Linux/Tools/DVD1/V15575-01.zip
[applmgr@appsnode1 StageR12]$
(4) Ran the unzip.sh script from the Stage directory (/u01/StageR12)
cd /u01/StageR12
./unzip.sh
During the unzipping process, when prompted, the dvd.label and component.label files were replaced. You can choose not to overwrite them as well because the dvd.label is same for all the DVDs belonging to the same category. For e.g, Databases has 9 DVDs and each of these DVDs dvd.label file is same.
cd /u01/StageR12
rm ora*/component.label
rm unzip.sh
After unzipping all the DVDs by running the unzip.sh script, the following directory structure was created.
With this, the pre-Installation steps are completed successfully and are ready to proceed with the Fresh Install of EBS R12 Next.
Install EBS R12 on Database Node using Rapid Install:
The Fresh Installation of R12 Database using Rapid Install cannot be directly installed on RAC HOME. It comes with non-RAC single instance binaries. So, I connected to one of the RAC Nodes (node1.hingu.net) and started the Rapid Install which installed the local non-RAC 11gR1 (11.1.0.7) Database. During the later stage, this database was then converted to RAC.
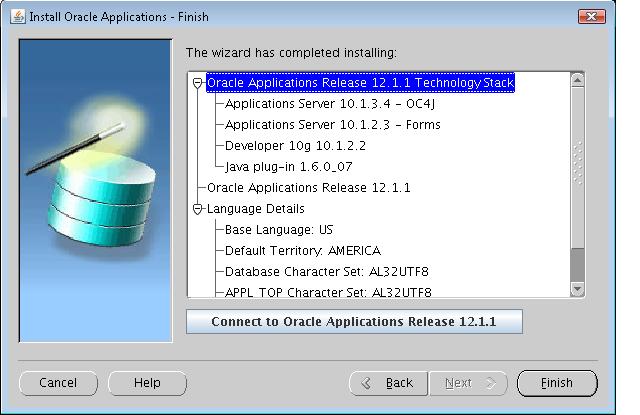
Using the X Terminal, Invoked the /u01/StageR12/startCD/Disk1/rapidwiz/rapidwiz.
Select Wizard operation:
Install Oracle Application Release 12.1.1
Oracle Configuration Manager (OCM) Detail:
My Oracle Support Password: *********
Configuration Choice:
Create New Configuration
Global System Settings:
Port Pool: 1
Database Node:
Database Type: Fresh Database
Database SID: LABDB
Host Name: node1
Domain Name: hingu.net
Database OS User: oracle
Database OS Group: dba
Base Directory: /u01/app/oracle/ebsR12
Licensing Selection:
Suite Licensing
License Additional Product:
Default.
Select Country-specific Functionalities:
No Selection (which means US as a default selection)
Internationalization Setting:
Selected Language: American_English – US
Default Territory: AMERICA
Database Character Set: AL32UTF8
APPL_TOP Character Set: AL32UTF8
Primary Application Node:
Host Name: appsnode1
Domain Name: hingu.net
Apps OS User: applmgr
Apps OS Group: dba
Base Directory: /u01/app/oracle/ebsR12
Instance Directory: /u01/app/oracle/ebsR12/inst
Application Services: All Enabled except “Batch Processing Services”
Node Information (Add Server):
Host Name: appsnode2
Domain Name: hingu.net
Apps OS User: applmgr
Apps OS Group: dba
Base Directory: /u01/app/oracle/ebsR12
Instance Directory: /u01/app/oracle/ebsR12/inst
Application Services: All Disabled except “Batch Processing Services” and “Other Sevices”
Node Information:
Shows the DB as well as Application nodes.
Pre-Install Checks:
Confirmed that all the Checks were passed
Component Installation Review:
Clicked ‘Next” to start the Rapid Installation Process.
Install EBS R12 on Application Node (appsnode1.hingu.net) using Rapid Install:
After completing the installation on the DB node, the Rapid Install was started on the Application node appsnode1.hingu.net.
Using the X Terminal, Invoked the /u01/StageR12/startCD/Disk1/rapidwiz/rapidwiz.
Select Wizard operation:
Install Oracle Application Release 12.1.1
Oracle Configuration Manager (OCM) Detail:
My Oracle Support Password: *********
Configuration Choice:
Load the following saved configuration: node1.hingu.net:LABDB:1522
Pre-Install Checks:
Confirmed that all the Checks were passed
Component Installation Review:
Clicked “Next” to start the Rapid Installation process.
Verified the Installation by logging into the application using LocalLogin
Install EBS R12 on Application Node (appsnode2.hingu.net) using Rapid Install:
After completing the installation on the DB node, the Rapid Install was started on the Application node appsnode2.hingu.net.
Using the X Terminal, Invoked the /u01/StageR12/startCD/Disk1/rapidwiz/rapidwiz.
Select Wizard operation:
Install Oracle Application Release 12.1.1
Oracle Configuration Manager (OCM) Detail:
My Oracle Support Password: *********
Configuration Choice:
Load the following saved configuration: node1.hingu.net:LABDB:1522
Pre-Install Checks:
Confirmed that all the Checks were passed
Component Installation Review:
Clicked “Next” to start the Rapid Installation process.
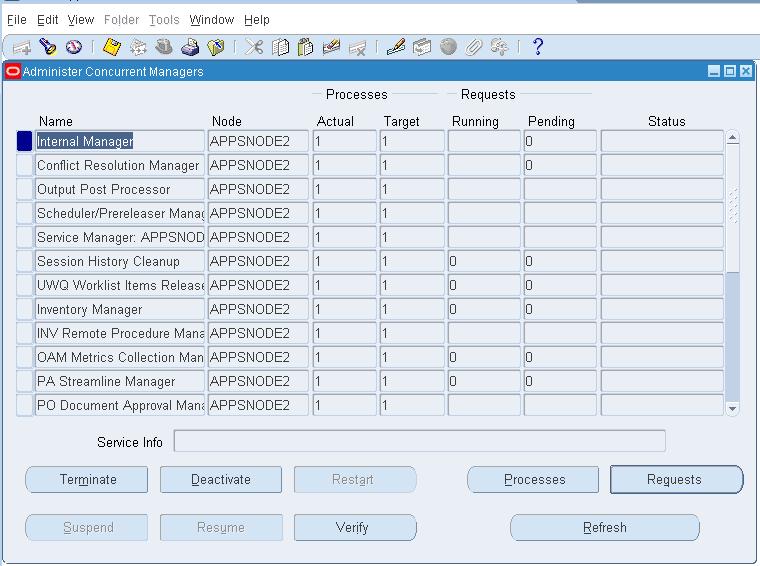
Verified the Concurrent Processes running on appsnode2
This patch needs to be applied to use the named listener on the DB tier. Without this patch, the listener name has to be LISTENER and I wanted to use the name LABDB_LISTENER for the application database listener so I decided to apply this patch.
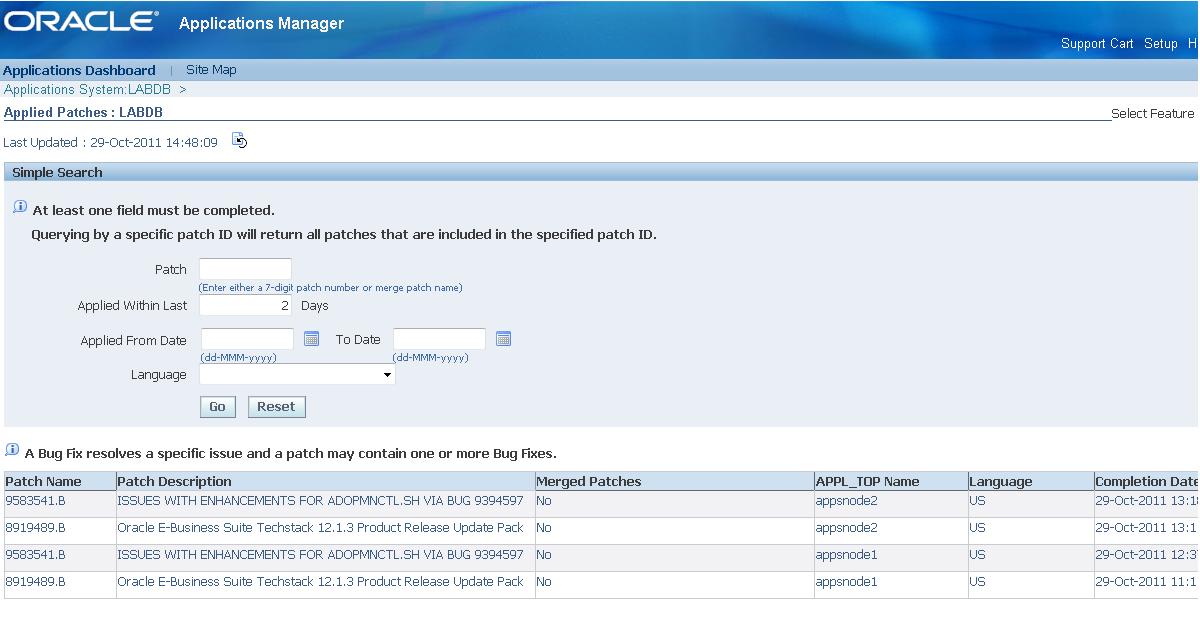
a) Downloaded the patch 8919489.
b) Downloaded the Patch 9583541 (post requirement for the patch 8919489).
c) Stopped the Application on both the nodes.
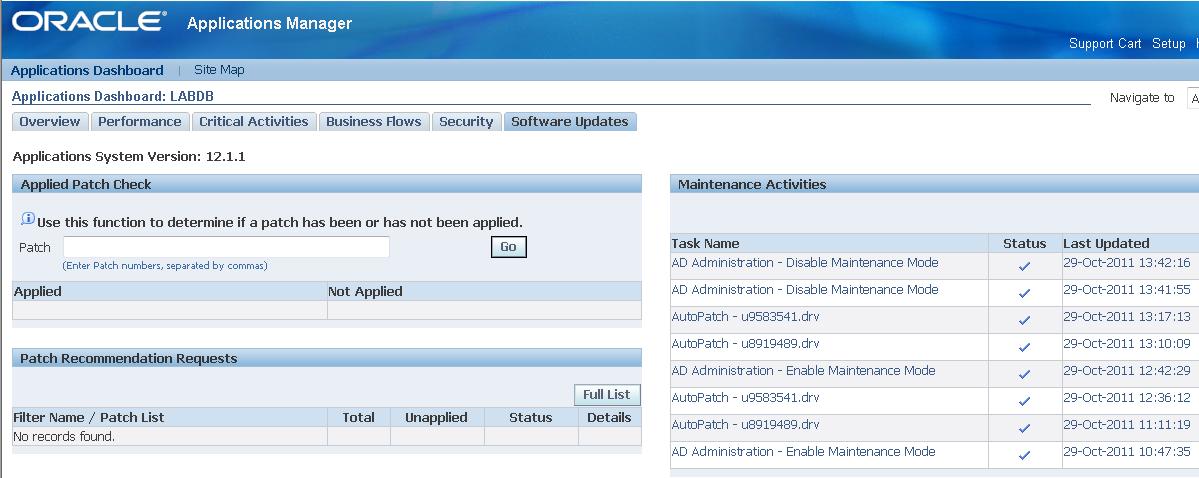
d) Applied the patch 8919489 using adpatch by following its README on appsnode1
e) Applied the patch 8919489 using adpatch by following its README on appsnode2
f) Ran the AutoConfig again on Admin Node (appsnode1.hingu.net) after applying the patch on appsnode2.
g) Tried to start the Application on appsnode1.hingu.net and it got warning message saying it could not deploy the latest EAR file.
The Forms were manually deployed by following the Metalink note “Deploying a New forms.ear File in Oracle Applications Release 12 [ID 397174.1]”. While running the script to deploy the forms, it got errored out with the below error message complaining it could not find the opmnctl executable.
cp $INST_TOP/ora/10.1.3/j2ee/forms/config/system-jazn-data.xml $INST_TOP/ora/10.1.3/j2ee/forms/config/system-jazn-data.xml.ori
*******FATAL ERROR*******
PROGRAM : /u01/app/oracle/ebsR12/apps/apps_st/appl/fnd/12.0.0/patch/115/bin/txkCfgOC4JApp.pl(/u01/app/oracle/ebsR12/apps/apps_st/appl/fnd/12.0.0/bin/txkrun.pl)
TIME : Sat Oct 29 13:47:38 2011
FUNCTION: TXK::Process::run [ Level 3 ]
MESSAGES:
Command error: <rc> = 32512, <command> = /u01/app/oracle/ebsR12/apps/tech_st/10.1.3/opmn/bin/opmnctl start
STACK TRACE
TXK::Error::abort('TXK::Error','HASH(0x923639c)') called at /u01/app/oracle/ebsR12/apps/apps_st/appl/au/12.0.0/perl/TXK/Common.pm line 299
TXK::Common::doError('TXK::Process=HASH(0xb7cad114)','Command error: <rc> = 32512, <command> = /u01/app/oracle/ebsR...','undef') called at /u01/app/oracle/ebsR12/apps/apps_st/appl/au/12.0.0/perl/TXK/Common.pm line 314
TXK::Common::setError('TXK::Process=HASH(0xb7cad114)','Command error: <rc> = 32512, <command> = /u01/app/oracle/ebsR...') called at /u01/app/oracle/ebsR12/apps/apps_st/appl/au/12.0.0/perl/TXK/Process.pm line 449
TXK::Process::run('TXK::Process=HASH(0xb7cad114)','HASH(0x9756fe4)') called at /u01/app/oracle/ebsR12/apps/apps_st/appl/fnd/12.0.0/patch/115/bin/txkCfgOC4JApp.pl line 1587
TXK::RunScript::execOPMNControl('HASH(0x9a3b224)') called at /u01/app/oracle/ebsR12/apps/apps_st/appl/fnd/12.0.0/patch/115/bin/txkCfgOC4JApp.pl line 599
require /u01/app/oracle/ebsR12/apps/apps_st/appl/fnd/12.0.0/patch/115/bin/txkCfgOC4JApp.pl called at /u01/app/oracle/ebsR12/apps/apps_st/appl/au/12.0.0/perl/TXK/RunScript.pm line 105
TXK::RunScript::require('TXK::RunScript','/u01/app/oracle/ebsR12/apps/apps_st/appl/fnd/12.0.0/patch/115...') called at /u01/app/oracle/ebsR12/apps/apps_st/appl/au/12.0.0/perl/TXK/Script.pm line 177
eval {...} called at /u01/app/oracle/ebsR12/apps/apps_st/appl/au/12.0.0/perl/TXK/Script.pm line 177
TXK::Script::run('TXK::Script=HASH(0x9b1c980)','/u01/app/oracle/ebsR12/inst/apps/LABDB_appsnode1/logs/appl/rg...','/u01/app/oracle/ebsR12/apps/apps_st/appl/fnd/12.0.0/patch/115...') called at /u01/app/oracle/ebsR12/apps/apps_st/appl/fnd/12.0.0/bin/txkrun.pl line 174
While further debugging, it was found out that the ORACLE_HOME and TNS_ADMIN variables in $IAS_ORACLE_HOME/opmn/bin/opmnctl were pointing to/nfs/bld/d26/PRDXBLD9/apps/tech_st/10.1.3 instead of /u01/app/oracle/ebsR12/apps/tech_st/10.1.3. These variables were correctly modified and then continued with the Note 397174.1 to deploy the forms.ear and after that, it got deployed successfully.
After that, the Application services were started on both the application nodes using $INST_TOP/admin/scripts/adstrtal.sh and tested logging in to the application and forms and the results were all successful.
OLD_11GR1_HOME: /u01/app/oracle/ebsR12/db/tech_st/11.1.0
NEW_11GR1_RAC_HOME: /u01/app/oracle/EBSR12
· Shutdown the application services on both the application nodes.
· Shutdown the listener LABDB on database node node1.
· Shutdown the database LABDB on node1.
· Performed the backup of Applications Tier on both the Application nodes.
· Performed the backup of OLD_11GR1_HOME
· Performed the backup of database.
· Created the listener LABDB_LISTENER on the same port 1522 under the NEW_11GR1_RAC_HOME using netca.
· Created the new tnsnames.ora and their ifiles on each node.
· Created the RAC specific spfile and started the instance LABDB1 on node1
· Added extra Redo Threads and UNDO TBS for the RAC Instances LABDB2 and LABDB3 on ASM diskgroup.
· Move the Database to ASM Diskgroup DATA.
· Enable the cluster mode in the database and started the LABDB database instances on all the RAC Nodes.
Perform the Application and Database Backup:
Appsnode1 and Appsnode2
$TNS_ADMIN/admin/scripts/adstpall.sh
On DB Node1:
Sqlplus / as sysdba
Shutdown immediate
Performed the Cold backup of database, Database Home and Application Home.
Start the Database after the backup
Sqlplus / as sysdba
startup
Created the RAC Listener LABDB_LISTENER:
In the NEW_11GR1_RAC_HOME which was created earlier during the preparation phase of DB Tier for the EBS R12 installation, created the new TNS_ADMIN directory on each RAC nodes.
[oracle@node1 admin]$ pwd
/u01/app/oracle/EBSR12/network/admin
[oracle@node1 admin]$ ssh node1 mkdir /u01/app/oracle/EBSR12/network/admin/LABDB1_node1
[oracle@node1 admin]$ ssh node2 mkdir /u01/app/oracle/EBSR12/network/admin/LABDB2_node2
[oracle@node1 admin]$ ssh node3 mkdir /u01/app/oracle/EBSR12/network/admin/LABDB3_node3
[oracle@node1 admin]$
Added the TNS_ADMIN entry in the /u01/app/oracle/EBSR12/bin/racgwrap (NEW_11GR1_RAC_HOME) file right under the ORACLE_HOME entry.
node1:/u01/app/oracle/EBSR12/bin/racgwrap
ORACLE_HOME=/u01/app/oracle/EBSR12
export ORACLE_HOME
export TNS_ADMIN=/u01/app/oracle/EBSR12/network/admin/LABDB1_node1
node2:/u01/app/oracle/EBSR12/bin/racgwrap
ORACLE_HOME=/u01/app/oracle/EBSR12
export ORACLE_HOME
export TNS_ADMIN=/u01/app/oracle/EBSR12/network/admin/LABDB2_node2
node3:/u01/app/oracle/EBSR12/bin/racgwrap
ORACLE_HOME=/u01/app/oracle/EBSR12
export ORACLE_HOME
export TNS_ADMIN=/u01/app/oracle/EBSR12/network/admin/LABDB3_node3
From RAC Node 1 (node1.hingu.net):
Stopped the listener LABDB created during the default installation on port 1522 from the OLD_11GR1_HOME.
Set the TNS_ADMIN for node1 as shown below and invoked the netca from NEW_11GR1_RAC_HOME to add the listener LABDB_LISTENER on RAC node node1
export TNS_ADMIN=/u01/app/oracle/EBSR12/network/admin/LABDB1_node1
/u01/app/oracle/EBSR12/bin/netca
Select the “Cluster Configuration”
Select node1
Select “Listener Configuration”
Select “Add”
Listener Name: LABDB_LISTENER
Selected Protocol: TCP
Port: 1522
Finish
Now, set the TNS_ADMIN for node 2 as shown below and invoked the same netca again add the listener LABDB_LISTENER on RAC node node2.
export TNS_ADMIN=/u01/app/oracle/EBSR12/network/admin/LABDB2_node2
/u01/app/oracle/EBSR12/bin/netca
Select the “Cluster Configuration”
Select node2
Select “Listener Configuration”
Select “Add”
Listener Name: LABDB_LISTENER
Selected Protocol: TCP
Port: 1522
Finish
Now, set the TNS_ADMIN for node 3 as shown below and invoked the same netca again to add the listener LABDB_LISTENER on RAC node node3.
export TNS_ADMIN=/u01/app/oracle/EBSR12/network/admin/LABDB3_node3
/u01/app/oracle/EBSR12/bin/netca
Select the “Cluster Configuration”
Select node3
Select “Listener Configuration”
Select “Add”
Listener Name: LABDB_LISTENER
Selected Protocol: TCP
Port: 1522
Finish
Created the tnsnames.ora under the NEW_11GR1_RAC_HOME:
node1:/u01/app/oracle/EBSR12/network/admin/LABDB1_node1/tnsnames.ora
node2:/u01/app/oracle/EBSR12/network/admin/LABDB2_node2/tnsnames.ora
node3:/u01/app/oracle/EBSR12/network/admin/LABDB3_node3/tnsnames.ora
The above mentioned tnsnames.ora files were created with the below contents on each of the database nodes. The IFILE entries were the only entry that was node specific and were adjusted appropriately on each node. The $TNS_ADMIN/<SID>_<nodename>_ifile.ora was created on each node with the same below information.
LABDB=
(DESCRIPTION=
(ADDRESS=(PROTOCOL=tcp)(HOST=node1-vip.hingu.net)(PORT=1522))
(ADDRESS=(PROTOCOL=tcp)(HOST=node2-vip.hingu.net)(PORT=1522))
(ADDRESS=(PROTOCOL=tcp)(HOST=node3-vip.hingu.net)(PORT=1522))
(CONNECT_DATA=
(SERVICE_NAME=LABDB)
)
)
LABDB1=
(DESCRIPTION=
(ADDRESS=(PROTOCOL=tcp)(HOST=node1-vip.hingu.net)(PORT=1522))
(CONNECT_DATA=
(SERVICE_NAME=LABDB)
(INSTANCE_NAME=LABDB1)
)
)
LABDB2=
(DESCRIPTION=
(ADDRESS=(PROTOCOL=tcp)(HOST=node2-vip.hingu.net)(PORT=1522))
(CONNECT_DATA=
(SERVICE_NAME=LABDB)
(INSTANCE_NAME=LABDB2)
)
)
LABDB3=
(DESCRIPTION=
(ADDRESS=(PROTOCOL=tcp)(HOST=node3-vip.hingu.net)(PORT=1522))
(CONNECT_DATA=
(SERVICE_NAME=LABDB)
(INSTANCE_NAME=LABDB3)
)
)
extproc_connection_data =
(DESCRIPTION=
(ADDRESS_LIST =
(ADDRESS=(PROTOCOL=IPC)(KEY=EXTPROCLABDB))
)
(CONNECT_DATA=
(SID=PLSExtProc)
(PRESENTATION = RO)
) )
LISTENER_LABDB1 =
(ADDRESS_LIST =
(ADDRESS = (PROTOCOL = TCP)(HOST = node1.hingu.net)(PORT = 1522))
)
LISTENER_LABDB2 =
(ADDRESS_LIST =
(ADDRESS = (PROTOCOL = TCP)(HOST = node2.hingu.net)(PORT = 1522))
)
LISTENER_LABDB3 =
(ADDRESS_LIST =
(ADDRESS = (PROTOCOL = TCP)(HOST = node3.hingu.net)(PORT = 1522))
)
LISTENERS_LABDB =
(ADDRESS_LIST =
(ADDRESS = (PROTOCOL = TCP)(HOST = node1-vip.hingu.net)(PORT = 1522))
(ADDRESS = (PROTOCOL = TCP)(HOST = node2-vip.hingu.net)(PORT = 1522))
(ADDRESS = (PROTOCOL = TCP)(HOST = node3-vip.hingu.net)(PORT = 1522))
)
IFILE=/u01/app/oracle/EBSR12/network/admin/LABDB1_node1/LABDB1_node1_ifile.ora
Created the sqlnet.ora under the NEW_11GR1_RAC_HOME:
node1:/u01/app/oracle/EBSR12/network/admin/LABDB1_node1/sqlnet.ora
node2:/u01/app/oracle/EBSR12/network/admin/LABDB2_node2/sqlnet.ora
node3:/u01/app/oracle/EBSR12/network/admin/LABDB3_node3/sqlnet.ora
The above mentioned sqlnet.ora files were created with the below contents on each of the database nodes.
NAMES.DIRECTORY_PATH=(TNSNAMES, ONAMES, HOSTNAME)
SQLNET.EXPIRE_TIME= 10
SQLNET.INBOUND_CONNECT_TIMEOUT =60
DIAG_ADR_ENABLED=ON
Created RAC spfile and started the LABDB1 instance from NEW_11GR1_RAC_HOME:
Created the required Directories to support the Instance specific entries in the spfile:
ssh node1 mkdir -p /u01/app/oracle/EBSR12/admin/LABDB1_node1
ssh node2 mkdir -p /u01/app/oracle/EBSR12/admin/LABDB2_node2
ssh node3 mkdir -p /u01/app/oracle/EBSR12/admin/LABDB3_node3
ssh node1 mkdir –p /u01/app/oracle/EBSR12/plsql/nativelib
ssh node2 mkdir –p /u01/app/oracle/EBSR12/plsql/nativelib
ssh node3 mkdir –p /u01/app/oracle/EBSR12/plsql/nativelib
ssh node1 mkdir -p /u01/app/oracle/EBSR12/appsutil/outbound/LABDB1_node1
ssh node2 mkdir -p /u01/app/oracle/EBSR12/appsutil/outbound/LABDB2_node2
ssh node3 mkdir -p /u01/app/oracle/EBSR12/appsutil/outbound/LABDB3_node3
Created the /tmp/initLABDB.ora from OLD_11GR1_HOME/dbs/initLABDB.ora and modified as shown below.
/tmp/initLABDB.ora
db_name = LABDB
control_files=/u01/app/oracle/ebsR12/db/apps_st/data/cntrl01.dbf,/u01/app/oracle/ebsR12/db/apps_st/data/cntrl02.dbf,/u01/app/oracle/ebsR12/db/apps_st/data/cntrl03.dbf
db_block_size = 8192
compatible = 11.1.0
_system_trig_enabled = true
nls_language = american
nls_territory = america
nls_date_format = DD-MON-RR
nls_numeric_characters = ".,"
nls_sort = binary # Required 11i setting
nls_comp = binary # Required 11i setting
nls_length_semantics = BYTE # Required 11i setting
LABDB1.diagnostic_dest = /u01/app/oracle/EBSR12/admin/LABDB1_node1
LABDB2.diagnostic_dest = /u01/app/oracle/EBSR12/admin/LABDB2_node2
LABDB3.diagnostic_dest = /u01/app/oracle/EBSR12/admin/LABDB3_node3
max_dump_file_size = 20480 # trace file size
timed_statistics = true
_trace_files_public = TRUE
processes = 200 # Max. no. of users x 2
sessions = 400 # 2 X processes
db_files = 512 # Max. no. of database files
dml_locks = 10000
cursor_sharing = EXACT # Required 11i settting
open_cursors = 600 # Consumes process memory, unless using MTS.
session_cached_cursors = 500
sga_target = 1G
shared_pool_size = 400M
shared_pool_reserved_size = 40M
db_block_checking = FALSE
db_block_checksum = TRUE
log_checkpoint_timeout = 1200 # Checkpoint at least every 20 mins.
log_checkpoint_interval = 100000
log_checkpoints_to_alert = TRUE
log_buffer = 10485760
undo_management=AUTO # Required 11i setting
LABDB1.undo_tablespace=APPS_UNDOTS1 # Required 11i setting
LABDB2.undo_tablespace=APPS_UNDOTS2 # Required 11i setting
LABDB3.undo_tablespace=APPS_UNDOTS3 # Required 11i setting
workarea_size_policy=AUTO # Required 11i setting
olap_page_pool_size = 4194304
pga_aggregate_target=1G
plsql_optimize_level = 2 # Required 11i setting
plsql_code_type = INTERPRETED # Default 11i setting
plsql_native_library_dir = /u01/app/oracle/EBSR12/plsql/nativelib
plsql_native_library_subdir_count = 149
LABDB1.utl_file_dir = /usr/tmp,/usr/tmp,/u01/app/oracle/EBSR12/appsutil/outbound/LABDB1_node1,/usr/tmp
LABDB2.utl_file_dir = /usr/tmp,/usr/tmp,/u01/app/oracle/EBSR12/appsutil/outbound/LABDB2_node2,/usr/tmp
LABDB3.utl_file_dir = /usr/tmp,/usr/tmp,/u01/app/oracle/EBSR12/appsutil/outbound/LABDB3_node3,/usr/tmp
aq_tm_processes = 1
job_queue_processes = 2
parallel_max_servers = 8
parallel_min_servers = 0
_b_tree_bitmap_plans = FALSE # Required 11i setting
_index_join_enabled = FALSE # Required 11i setting
_like_with_bind_as_equality = TRUE
_sort_elimination_cost_ratio=5
_fast_full_scan_enabled = FALSE
query_rewrite_enabled = true
_sqlexec_progression_cost=2147483647
optimizer_secure_view_merging=false
_optimizer_autostats_job=false # Turning off auto statistics
LABDB1.LOCAL_LISTENER=LISTENER_LABDB1
LABDB2.LOCAL_LISTENER=LISTENER_LABDB2
LABDB3.LOCAL_LISTENER=LISTENER_LABDB3
REMOTE_LISTENER=LISTENERS_LABDB
LABDB1.thread=1
LABDB2.thread=2
LABDB3.thread=3
LABDB1.instance_number=1
LABDB2.instance_number=2
LABDB3.instance_number=3
db_recovery_file_dest_size=20971520000
db_recovery_file_dest='+FRA'
db_create_file_dest='+DATA'
db_create_online_log_dest_1='+DATA'
db_create_online_log_dest_2='+FRA'
Created the spfile +DATA/LABDB/spfileLABDB.ora from the above pfile.
export ORACLE_HOME=/u01/app/oracle/EBSR12
export ORACLE_SID=LABDB1
$ORACLE_HOME/bin/sqlplus / as sysdba ß Database was still down at this point. Only connected to an idle instance to create spfile
create spfile='+DATA/LABDB/spfileLABDB.ora' from pfile='/tmp/initLABDB.ora';
Create the NEW_11GR1_RAC_HOME/dbs/init<SID>.ora on all the RAC Nodes with the below entry in it.
node1.hingu.net:/u01/app/oracle/EBSR12/dbs/initLABDB1.ora
spfile='+DATA/LABDB/spfileLABDB.ora'
node2.hingu.net:/u01/app/oracle/EBSR12/dbs/initLABDB2.ora
spfile='+DATA/LABDB/spfileLABDB.ora'
node3.hingu.net:/u01/app/oracle/EBSR12/dbs/initLABDB3.ora
spfile='+DATA/LABDB/spfileLABDB.ora'
Started the instance LABDB1 on node1 from NEW_11GR1_RAC_HOME:
The instance LABDB1 was started after setting the appropriate env variables on node1. The cluster_database parameter was still not enabled at this stage.
export ORACLE_HOME=/u01/app/oracle/EBSR12
export ORACLE_SID=LABDB1
$ORACLE_HOME/bin/sqlplus / as sysdba
startup
Created extra Redo Threads and Undo Tablespaces for the RAC instances LABDB2 and LABDB3 on ASM diskgroup DATA:
create undo tablespace APPS_UNDOTS2 datafile '+DATA' size 100M autoextend on next 1M maxsize 1G extent management local;
create undo tablespace APPS_UNDOTS3 datafile '+DATA' size 100M autoextend on next 1M maxsize 1G extent management local;
alter database add logfile thread 2 group 3 size 100M;
alter database add logfile thread 2 group 4 size 100M;
alter database add logfile thread 3 group 5 size 100M;
alter database add logfile thread 3 group 6 size 100M;
alter database enable public thread 2;
alter database enable public thread 3;
Move the database LABDB to ASM diskgroup DATA:
Move the Online Redo Logs belonging to LABDB1 instance from local Filesystem to ASM diskgroup DATA
sqlplus / as sysdba
alter database add logfile thread 1 group 50 size 10M;
alter database drop logfile group 1;
alter database add logfile thread 1 group 1 size 100M;
alter database drop logfile group 2;
alter database add logfile thread 1 group 2 size 100M;
alter database drop logfile group 50;
Move the TEMPORARY TABLESPACE from local Filesystem to ASM diskgroup DATA
create temporary tablespace temptbs tempfile '+DATA' size 100M;
alter database default temporary tablespace temptbs;
drop tablespace temp1 including contents and datafiles;
drop tablespace temp2 including contents and datafiles;
Move the control files from local Filesystem to ASM diskgroup DATA
SQL> alter system set control_files='+DATA','+FRA' scope=spfile sid='*';
shutdown immediate
startup nomount
[oracle@node1 ~]$ rman target /
Recovery Manager: Release 11.1.0.7.0 - Production on Sun Oct 30 17:03:53 2011
Copyright (c) 1982, 2007, Oracle. All rights reserved.
connected to target database: LABDB (not mounted)
RMAN> restore controlfile from '/u01/app/oracle/ebsR12/db/apps_st/data/cntrl01.dbf';
Starting restore at 30-OCT-11
using target database control file instead of recovery catalog
allocated channel: ORA_DISK_1
channel ORA_DISK_1: SID=376 device type=DISK
channel ORA_DISK_1: copied control file copy
output file name=+DATA/labdb/controlfile/current.267.765911037
output file name=+FRA/labdb/controlfile/current.263.765911059
Finished restore at 30-OCT-11
SQL> alter system set control_files='+DATA/labdb/controlfile/current.267.765911037','+FRA/labdb/controlfile/current.263.765911059' scope=spfile sid='*';
Move the datafiles from local Filesystem to ASM diskgroup DATA
startup mount;
BACKUP AS COPY DATABASE FORMAT ‘+DATA’;
switch database to copy;
alter database open;
Start the RAC Instances on node2 and node2:
After setting the cluster_database parameter to true, restarted the instance LABDB1 and started the remaining instances LABDB2 and LABDB3.
On node1:
alter system set cluster_database=true scope=spfile sid='*';
shutdown immediate
startup
On node2:
startup
On node3:
startup
Register the Database and Instances to the OCR.
srvctl add database -d LABDB -o /u01/app/oracle/EBSR12 -p +data/labdb/spfileLABDB.ora -m hingu.net
srvctl add instance -d LABDB -i LABDB1 -n node1
srvctl add instance -d LABDB -i LABDB2 -n node2
srvctl add instance -d LABDB -i LABDB3 -n node3
srvctl modify instance -d LABDB -i LABDB1 -s +ASM1
srvctl modify instance -d LABDB -i LABDB2 -s +ASM2
srvctl modify instance -d LABDB -i LABDB3 -s +ASM3
Database was successfully converted and opened to RAC. At this stage, the application services on application nodes were still down.
At this stage, the application did not know about the RAC nodes until the autoconfig was enabled and run on the DB tier from the RAC HOME.
· Setup appsutil directory under /u01/app/oracle/EBSR12 HOME.
· Verify the TNS connection to each of the Individual RAC Instances
· Create nls/data/9idata directory
· Delete the FND Node Configuration from the Database.
· Build XML on each RAC node of the DB Tier.
· Run AutoConfig on each RAC node of the DB Tier.
Setup appsutil Directory on All the RAC Nodes.
(1) On the application admin node, appsnode1, the appsutil.zip was generated and copied over to all the DB Tier nodes (node1, node2 and node3) under the /u01/app/oracle/EBSR12.
Generate the appsutil.zip
[applmgr@appsnode1 ~]$ $AD_TOP/bin/admkappsutil.pl
Starting the generation of appsutil.zip
Log file located at /u01/app/oracle/ebsR12/inst/apps/LABDB_appsnode1/admin/log/MakeAppsUtil_10291438.log
output located at /u01/app/oracle/ebsR12/inst/apps/LABDB_appsnode1/admin/out/appsutil.zip
MakeAppsUtil completed successfully.
copy to all the RAC Nodes FROM appsnode1:
scp /u01/app/oracle/ebsR12/inst/apps/LABDB_appsnode1/admin/out/appsutil.zip oracle@node1:/u01/app/oracle/EBSR12
scp /u01/app/oracle/ebsR12/inst/apps/LABDB_appsnode1/admin/out/appsutil.zip oracle@node2:/u01/app/oracle/EBSR12
scp /u01/app/oracle/ebsR12/inst/apps/LABDB_appsnode1/admin/out/appsutil.zip oracle@node3:/u01/app/oracle/EBSR12
unzip the appsutil.zip on all the RAC Nodes:
cd /u01/app/oracle/EBSR12
unzip –o appsutil.zip
(2) The jre directory was copied from the OLD_11GR1_HOME (/u01/app/oracle/ebsR12/db/tech_st/11.1.0/appsutil/jre) to the NEW_11GR1_RAC_HOME (/u01/app/oracle/EBSR12/appsutil) on all the nodes.
cp –r /u01/app/oracle/ebsR12/db/tech_st/11.1.0/appsutil/jre oracle@node1:/u01/app/oracle/EBSR12
scp /u01/app/oracle/ebsR12/inst/apps/LABDB_appsnode1/admin/out/appsutil.zip oracle@node1:/u01/app/oracle/EBSR12
scp /u01/app/oracle/ebsR12/inst/apps/LABDB_appsnode1/admin/out/appsutil.zip oracle@node1:/u01/app/oracle/EBSR12
The Instance Connectivity from each of the RAC instances was verified using SQLPLUS from RAC nodes individually. I would not run adconfig.pl without having successful connection to each of the RAC instances.
RAC Instance Connections Verification:
The Instance Connectivity from each of the RAC instances was verified using SQLPLUS from RAC nodes individually. The connectivity was confirmed before running the adconfig.pl on each of the RAC instances.
node1:
export ORA_NLS10=/u01/app/oracle/EBSR12/nls/data/9idata
export ORACLE_HOME=/u01/app/oracle/EBSR12
export ORACLE_SID=LABDB1
export TNS_ADMIN=/u01/app/oracle/EBSR12/network/admin/LABDB1_node1
export LD_LIBRARY_PATH=/u01/app/oracle/EBSR12/lib:/u01/app/oracle/EBSR12/ctx/lib
export PATH=$ORACLE_HOME/bin:$PATH:.
sqlplus apps/apps@LABDB1
Repeated the above process for all the RAC Instances.
Create the nls/data/9idata Directory (on All the RAC Nodes):
On all the RAC Nodes, ran the /u01/app/oracle/EBSR12/nls/data/old/cr9idata.pl script to create the /u01/app/oracle/EBSR12/nls/data/9idata directory. Without this directory, the adconfig.sh on DB tier may fail on this.
[oracle@node1 old]$ perl cr9idata.pl
Creating directory /u01/app/oracle/EBSR12/nls/data/9idata ...
Copying files to /u01/app/oracle/EBSR12/nls/data/9idata...
Copy finished.
Please reset environment variable ORA_NLS10 to /u01/app/oracle/EBSR12/nls/data/9idata!
[oracle@node1 old]$
Clean the current Configuration in the Database
SQL> exec fnd_conc_clone.setup_clean;
Build XML (on all the RAC Nodes):
Ran the /u01/app/oracle/EBSR12/appsutil/bin/adbldxml.pl to build the XML on each of the RAC Nodes and provided the appropriate values of DB Host Name, Database Port, SID, and Service Name. This will generate the context file <SID>_hostname.xml under /u01/app/oracle/EBSR12/appsutil.
[oracle@node1 bin]$ ./adbldxml.pl
Starting context file generation for db tier..
Using JVM from /u01/app/oracle/EBSR12/appsutil/jre/bin/java to execute java programs..
APPS Password: apps
The log file for this adbldxml session is located at:
/u01/app/oracle/EBSR12/appsutil/log/adbldxml_10311041.log
UnsatisfiedLinkError exception loading native library: njni11
Could not Connect to the Database with the above parameters, Please answer the Questions below
Enter Hostname of Database server: node1
Enter Port of Database server: 1522
Enter SID of Database server: LABDB1
Enter Database Service Name: LABDB
Enter the value for Display Variable: 1
The context file has been created at:
/u01/app/oracle/EBSR12/appsutil/LABDB1_node1.xml
Once the context file got generated, the below variables were modified (in RED) to their appropriate values.
<!-- host information -->
<oa_host>
<host oa_var="s_hostname">node3</host>
<host oa_var="s_virtual_hostname">node1-vip</host>
<private_address oa_var="s_clusterInterConnects">node1-prv</private_address>
<domain oa_var="s_domainname">hingu.net</domain>
Similar way, the XML file was generated on node2 and node3 by providing their node specific values.
Run autoconfig on all the RAC nodes one by one:
Ran the Autoconfig on all the RAC nodes separately using the script /u01/app/oracle/EBSR12/appsutil/bin/adconfig.sh.
export ORA_NLS10=/u01/app/oracle/EBSR12/nls/data/9idata
export ORACLE_HOME=/u01/app/oracle/EBSR12
export ORACLE_SID=LABDB2
export TNS_ADMIN=/u01/app/oracle/EBSR12/network/admin/LABDB2_node2
export LD_LIBRARY_PATH=/u01/app/oracle/EBSR12/lib:/u01/app/oracle/EBSR12/ctx/lib
export PATH=$ORACLE_HOME/bin:$PATH:.
cd /u01/app/oracle/EBSR12/appsutil/bin
./adconfig.sh
The AutoConfig was again ran on all the RAC Nodes using below command in the reverse order so that all the nodes’ tnsnames.ora file contains the same information.
/u01/app/oracle/EBSR12/appsutil/scripts/LABDB3_node3/adautocfg.sh ß for node3
/u01/app/oracle/EBSR12/appsutil/scripts/LABDB2_node2/adautocfg.sh ß for node2
/u01/app/oracle/EBSR12/appsutil/scripts/LABDB1_node1/adautocfg.sh ß for node1
Modify the $ORACLE_HOME/dbs/<SID>_APPS_BASE.ora on all the RAC Nodes:
The <SID>_APPS_BASE.ora file under the /u01/app/oracle/EBSR12/dbs contains the wrong values for the control_files parameter. So, this file was modified on all the RAC nodes with the correct value of control_files parameter.
control_files = '+DATA/labdb/controlfile/current.267.765911037','+FRA/labdb/controlfile/current.263.765911059'
At this stage, the FND Nodes contained the RAC nodes information in the application database.
Run the AutoConfig on the Application nodes.
After enabling and running the AutoConfig successfully on the DB tier RAC nodes, it is required to run the autoconfig on all the Application nodes so that they can generate the new RAC specific TNS and jdbc_url entry. I followed the below steps to accomplish this requirement.
· Modify $TNS_ADMIN/tnsnames.ora file and jdbc_url in the CONTEXT_FILE.
· Check the connection to the database after the above modification.
· Run the AutoConfig
· Repeat the above 3 steps on remaining application node appsnode2.
· At last, run the AutoConfig on the Admin Node (appsnode1).
Modify the tnanames.ora and jdbc_url:
The CONNECT_DATA entry in the $TNS_ADMIN/tnsnames.ora file was modified to have SERVICE_NAME and INSTANCE_NAME value for all the TNS Alias belonging to Database instance. (On both the Application Nodes appsnode1 and appsnode2)
LABDB=
(DESCRIPTION=
(ADDRESS=(PROTOCOL=tcp)(HOST=node1.hingu.net)(PORT=1522))
(CONNECT_DATA=
(SERVICE_NAME=LABDB)
(INSTANCE_NAME=LABDB1)
)
LABDB_BALANCE=
(DESCRIPTION=
(ADDRESS_LIST=
(LOAD_BALANCE=YES)
(FAILOVER=YES)
(ADDRESS=(PROTOCOL=tcp)(HOST=node1.hingu.net)(PORT=1522))
)
(CONNECT_DATA=
(SERVICE_NAME=LABDB)
)
)
Jdbc_url value in the below context file was modified with the same above information as shown on both the application nodes appsnode1 and appsnode2.
appsnode1:/u01/app/oracle/ebsR12/inst/apps/LABDB_appsnode1/appl/admin/LABDB_appsnode1.xml
appsnode2:/u01/app/oracle/ebsR12/inst/apps/LABDB_appsnode2/appl/admin/LABDB_appsnode2.xml
<jdbc_url oa_var="s_apps_jdbc_connect_descriptor">jdbc:oracle:thin:@(DESCRIPTION=(ADDRESS_LIST=(LOAD_BALANCE=YES)(FAILOVER=YES)(ADDRESS=(PROTOCOL=tcp)(HOST=node1.hingu.net)(PORT=1522)))(CONNECT_DATA=(SERVICE_NAME=LABDB)(INSTANCE_NAME=LABDB1)))</jdbc_url>
Run the AutoConfig on appsnode1:
$AD_TOP/bin/adconfig.sh contextfile=/u01/app/oracle/ebsR12/inst/apps/LABDB_appsnode1/appl/admin/LABDB_appsnode1.xml
After successful completion of autoconfig and re-sourcing the environment, the $TNS_ADMIN/tnsnames.ora file was containing the tns aliases for all the RAC instances individually and also had a BALANCE entry containing all the DB VIPs as shown below:
LABDB_BALANCE=
(DESCRIPTION=
(ADDRESS_LIST=
(LOAD_BALANCE=YES)
(FAILOVER=YES)
(ADDRESS=(PROTOCOL=tcp)(HOST=node2-vip.hingu.net)(PORT=1522))
(ADDRESS=(PROTOCOL=tcp)(HOST=node1-vip.hingu.net)(PORT=1522))
(ADDRESS=(PROTOCOL=tcp)(HOST=node3-vip.hingu.net)(PORT=1522))
)
(CONNECT_DATA=
(SERVICE_NAME=LABDB)
)
)
The new jdbc_url in the CONTEXT_FILE on appsnode1 was reflecting all the 3 VIPs of database RAC nodes at this stage.
Run the Autoconfig on appsnode2:
Same way, I ran the autoconfig on the appsnode2 using below command.
$AD_TOP/bin/adconfig.sh contextfile=/u01/app/oracle/ebsR12/inst/apps/LABDB_appsnode2/appl/admin/LABDB_appsnode2.xml
Re-Run the AutoConfig on appsnode2 and appsnode1:
I re-ran the autoconfig on the both the application nodes using below command before started the applications.
$INST_TOP/admin/scripts/adautocfg.sh
Tested the login page and verified the Nodes information in the OAM as well as database.
FND Nodes Configuration:
At this stage, the configuration has 5 nodes total, 3 are DB nodes and 2 are application nodes.
Start the Applications on both the Application Nodes
Started the Application on appsnode1.hingu.net and appsnode2.hingu.net
$INST_TOP/admin/scripts/adstrtal.sh
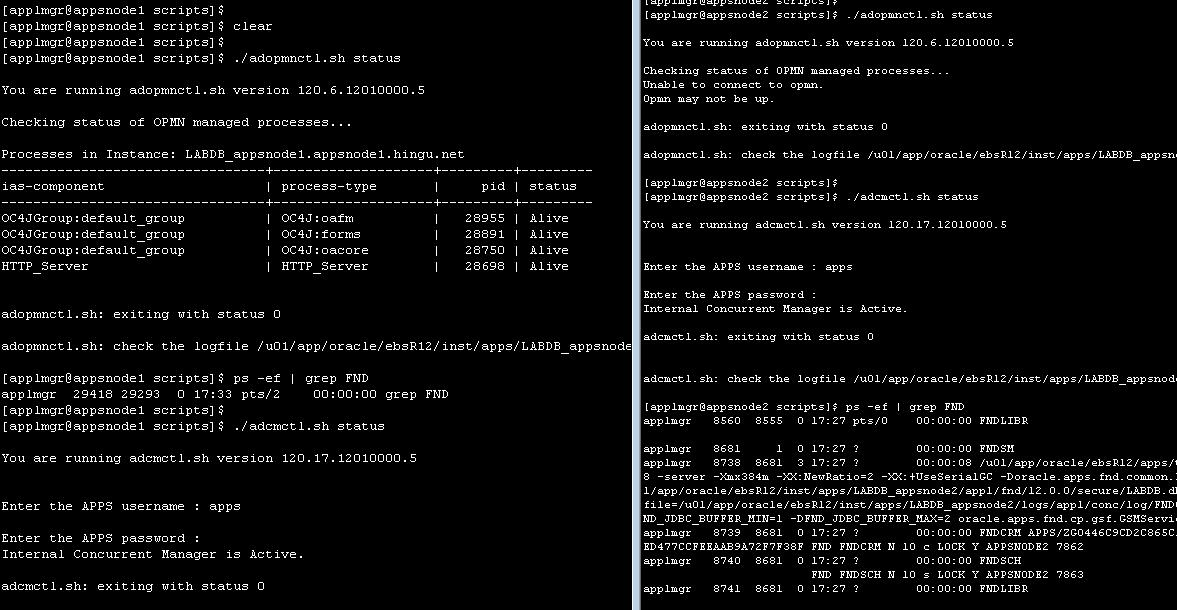
Verified the OS processes on both the application nodes to confirm that the enabled services are started and running successfully.
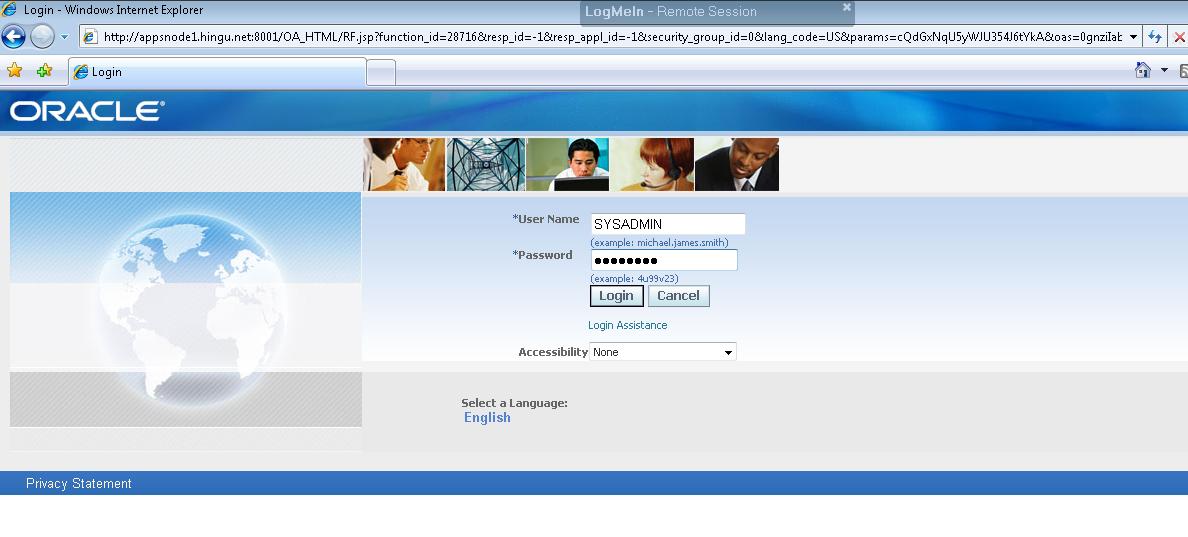
Logged in to the Application using login page url.
http://appsnode1.hingu.net:8001/OA_HTML/AppsLogin
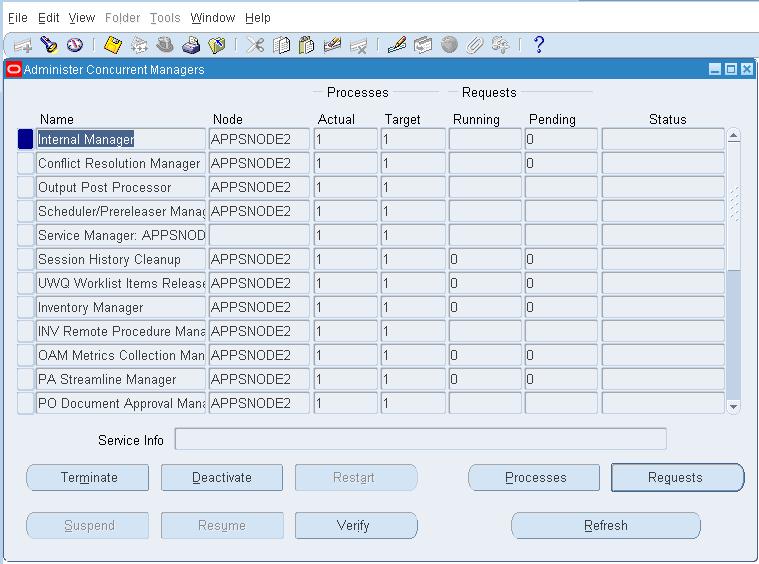
Verified that the Concurrent Managers are started and running on the Concurrent Node (appsnode2.hingu.net)
OAM Configuration:
(a) listnener.ora, tnsnames.ora, sqlnet.ora and their ifiles from all the RAC nodes.
(b) listnener.ora and tnsnames.ora from both the application nodes.
(c) CONTEXT_FILE from all the 5 nodes.
(d) Pfile of the RAC database.